|
| |
TM 55-2915-335-30&P
2-11. PUMP CANISTER - INSPECT/REPLACE (Cont)
2-11
4. INSTALLATION
a.
b.
c.
d.
e.
f.
g.
h.
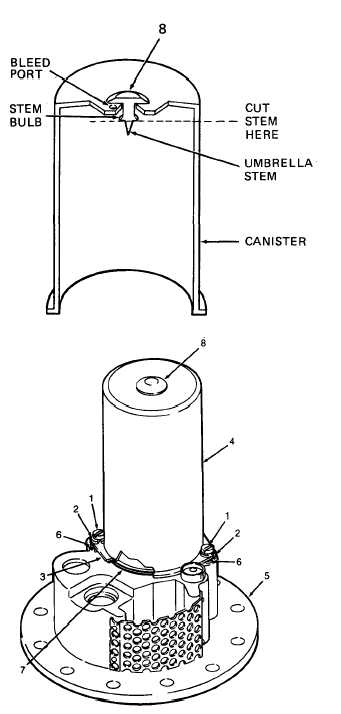
Lubricate stem of new umbrella check valve (8)
with petrolatum (Item 6, Appendix C).
Insert umbrella stem in center hole, over canister
bleed ports. Use needle-nose pliers to reach inside
canister and grip umbrella stem.
While pushing on top of umbrella with index
finger, pull umbrella stem gently with pliers, work-
ing the stem from side to side. Pull until stem bulb
pulls through.
Be sure to cut off the stem of the canister
bleed port umbrella. If not removed, the
umbrella stem may block a motor cover
bleed port and cause the motor to over-
heat.
Use scissors or long nose cutters to cut off
umbrella stem, just below bulb. Don’t cut off the
stem bulb; the bulb holds umbrella check valve (8)
in place.
Lubricate new preformed packing (7) with
petrolatum (Item 6, Appendix C). Apply a thin,
even coating. Install packing in packing groove.
Place spacer washers (6) over flange mounting
holes. Position with cut-out part of spacer facing
preformed packing (7).
Place pump canister (4) on housing. Install
canister flange (3) over canister, with beveled edge
down, Align screw holes.
Check for proper position of spacer washers (6).
Apply one drop of thread locking compound
(Item 3, Appendix C) to threads of machine
screws (1). Install lockwashers (2) and machine
screws (1), and tighten.
NOTE
FOLLOW-ON MAINTENANCE: Install pump cartridge in housing
(paragraph 2-10).
END OF TASK
2-28
|