|
| |
TM 5-4320-313-14
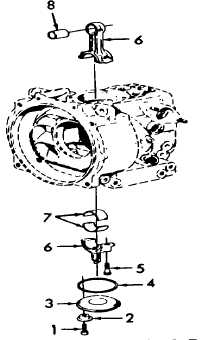
e. Installation. (Refer to figure 6-6).
(1) Using an arbor press, press bushing (8) into connecting rod (6).
CAUTION
Be certain that bearing halves are installed correctly. The bottom bearing half (7) has a hole which fits
into lower connecting rod half (6).
(2) Carefully insert bearing halves (7) into connecting rod.
CAUTION
• Be certain that the numbers on both halves of the connecting rod match.
• When installing connecting rod, make sure it does not knock against crankcase. This could result in
serious damage to connecting rod.
(3) Apply a light coat of lubricating oil to both bearing halves.
(4) Install top and bottom of connecting rod (6) on crankshaft with dipping opening on bottom half to dipstick
side.
(5) Install two screws (5). Using a torque wrench and allen socket, tighten screws to 29.50 ft-lbs (40 Nm).
(6) Position packing (4) on cover (3). Install cover (3) and secure with four caps (2) and four screws (1).
(7) Refer to paragraph 5-11 and install piston.
Figure 6-6. Connecting Rod Installation.
6-9
|