|
| |
TM 5-4320-313-14
6-2. CONNECTING ROD - Continued.
b. Cleaning.
WARNING
Do not breathe cleaning solvent P-D-680 vapors for long periods of time or use solvent near open
flames. To avoid illness, explosion, or fire, only use solvent in well-ventilated areas away from open
flames.
(1) Clean connecting rod with a rag and cleaning solvent.
(2) Remove any carbon deposits with a wire brush.
c. Inspection.
(1) Visually inspect connecting rod for bending, warping, or other damage. Replace a damaged connecting rod.
(2) Inspect upper and lower bearing halves for excessive wear, scoring, pitting, flaking, etching, and signs of
overheating. Inspect bearing backs for bright spots (bearing moving in supports).
(3) Temporarily assemble connecting rod with two new allen screws and without bearings. Using torque
wrench, tighten screws to 29.50 ft-lbs (40 Nm). Apply some oil to threads and contact surfaces.
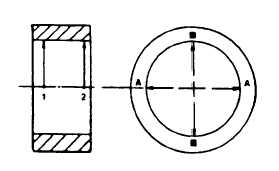
(4) Measure inside diameter of connecting rod bearing bore. Measurement should be 1.8114 to 1.8107 inches
(46.010 to 45.994 mm). If measurement is outside specified limits, replace connecting rod.
(5) Disassemble connecting rod and carefully insert bearing halves. The bottom half has a hole which fits into
connecting rod cup. Reassemble connecting rod with two allen screws. Tighten screws following
procedures described in step (3).
Figure 6-5. Measuring Connecting Rod Bushing Inside Diameter.
d. Repair. Repair to the connecting rod is limited to replacing the bearing halves and bushing.
6-8
|