|
| |
TM 5-4320-305-24
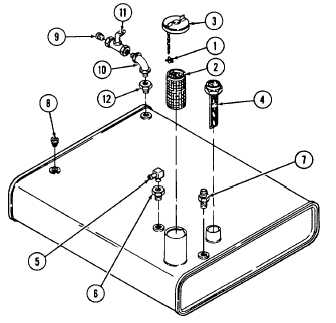
2-41. REPLACE/REPAIR FUEL TANK ASSEMBLY (Continued)
DISASSEMBLY:
1 Remove assembled fuel filler screen and fuel tank
cap. Disengage connector clip (1) from fuel filler
screen (2) to separate fuel tank cap (3).
2 Unscrew and remove fuel gage (4).
3 Unscrew and remove 90 degree elbow (5) and
bushing (6).
4 Unscrew and remove male connector (7).
5 Unscrew and remove plugs (8 and 9).
6 Unscrew and remove street elbow (10), drain cock
(11), and bushing (12).
INSPECTION/REPAIR:
WARNING
Death or serious injury could occur if diesel fuel oil is not handled
carefully. Use in a well-ventilated area away from open flame,
arcing equipment, ignition sources, heaters, or excessive heat.
Always store fuel in proper, marked containers. DO NOT SMOKE.
Death or serious injury could occur if compressed air is directed
against the skin. Do not use compressed air for cleaning or drying
unless the pressure is/has been reduced to 30 psi (2.11 kgcm2) or
less. When working with compressed air always use chip guards,
eye protection, and other personal protective equipment.
1 Inspect fuel tank shield for dents, rust, corrosion, or other damage. Replace as necessary.
2 Clean fuel tank straps and cushion mounts with diesel fuel oil and dry with compressed air. Inspect for minor rust,
corrosion, or other damage. Replace fuel tank straps if severely rusted or damaged. Inspect for worn or missing
cushion mounts. Replace cushion mounts if damaged or missing.
3 Clean outside of fuel tank assembly with diesel fuel oil. Dry with compressed air. Inspect for minor rust, corrosion, or
broken welds. Replace if damaged.
2-152
|