 |
|||
|
|
|||
|
Page Title:
Section II. PREVENTIVE MAINTENANCE CHECKS AND SERVICES |
|
||
| ||||||||||
|
|
 CAUTION
Do not use solvent of any kind to
clean the oil filter housing. If solvent
gets into the lubricating system, it
can thin the oil so that it no longer
protects the engine from wear.
(4) Wipe the interior of the filter housing with a
clean, dry cloth.
(5) Install a new filter element in the filter
housing.
(6) Replace gasket and cap. Before you tighten
the attaching screw, carefully check the position of the
gasket. If the cap is slightly tilted, the gasket probably is
not seated. Loosen the screw and recheck it. When
you are sure that the gasket is in its correct position,
tighten the screw on the cover. It is not necessary to
tighten the screw with all your strength, but it must be
tight enough so that it will not loosen up during
operation.
(7) Add 51/2 quarts of the proper grade oil (see
housing and filler tube.
(8) Start engine and watch the oil filter closely.
If the gasket is not properly seated, a large amount of oil
can be lost in a very short time. No leakage is
permitted. If you see any leakage, stop the engine
immediately and repeat step (6) above to stop the leak.
(9) Shut off the engine after 3 to 5 minutes.
Wait 5 to 10 minutes for the engine oil to drain back into
the crankcase, and check the oil level on the dipstick (8,
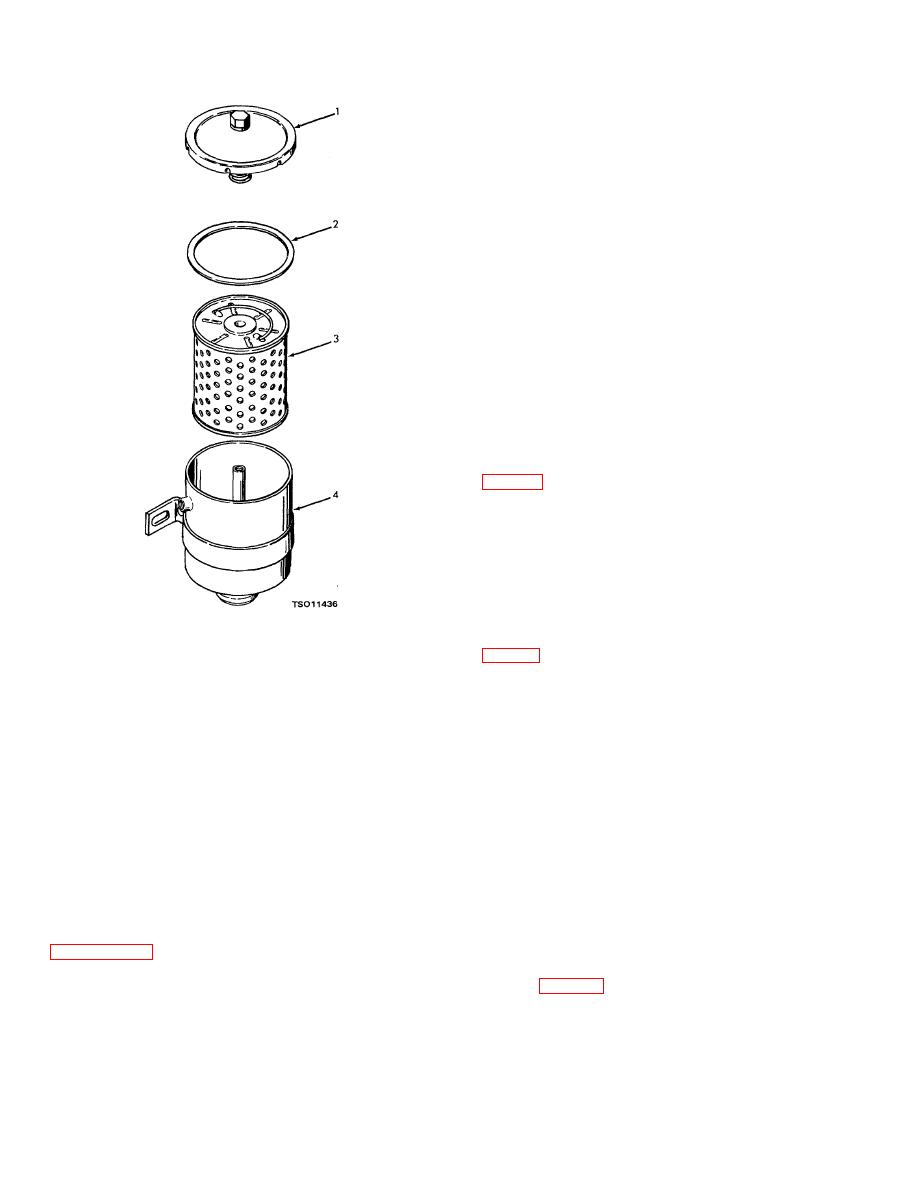
1. Oil filter cover
3. Filter element
2. Cover gasket
4. Oil filter housing
3-4. Pump Lubrication
Figure 3-4. Oil filter, exploded view.
The pump shaft bearings were packed with grease by
the manufacturer at assembly and require no
(3) Remove the oil filter element (3) by lifting up
subsequent lubrication except at overhaul periods. No
the handle provided. Use a clean cloth to remove
other pump lubrication is required.
excess oil from the filter housing (4).
Section II. PREVENTIVE MAINTENANCE CHECKS AND SERVICES
3-5. General
ceased. Stop operation immediately if a deficiency is
noted during operation which would damage the
equipment if operation were continued. All deficiencies
To ensure that the centrifugal pump is ready for
and shortcomings will be recorded together with the
operation at all times, it must be inspected
corrective action taken on DA Form 2404 (Equipment
systematically so that defects may be discovered and
Inspection and Maintenance Worksheet) at the earliest
corrected before they result in serious damage or
possible opportunity.
failure. The necessary preventive maintenance checks
and services to be performed are listed and described in
3-6. Preventive Maintenance Checks and Services
sequence of minimum inspection requirements. Defects
discovered during operation of the unit will be noted for
Refer to table 3-1 for a listing of operator's preventive
future correction to be made as soon as operation has
maintenance checks and services.
3-6
|
|
Privacy Statement - Press Release - Copyright Information. - Contact Us |