|
| |
TM 10-4320-324-14
6-7. Engine Assembly Repair (CONT).
(21) Check that cylinder top and bottom joint faces are flat. Replace cylinders as needed.
(22) Measure diameter of piston pin and gauge bore of piston pin bushing with a micrometer and an internal dial
gauge. The reading should be between 0.0015 inch (0.04 mm) and 0.0035 inch (0.091 mm). If clearance is on
the high side, replace piston pin bushing.
(23) Inspect piston for damage or visible wear, including bosses.
(24) Using standard measuring tools, ensure axial piston ring clearance (Table 6-1).
(25) Using trapezoidal groove wear gauge, measure piston ring grooves (Table 6-1).
(26) Using magnaflux penetrant, check crankshaft for cracks. Replace crankshaft if cracked.
(27) Measure crankshaft as follows:
(a)
Remove gearwheel (104) from crankshaft.
(b)
Support crankshaft at outer main journals
on prism-shaped blocks.
(c)
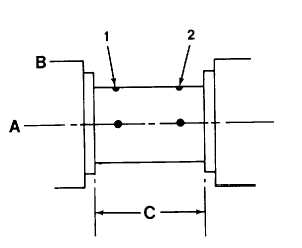
Measure outside diameter of each bearing
journal at points "1" and "2," in the vertical
and horizontal, as indicated by "a" and "b".
(d) Measure width "C" for a locating bearing.
(e) Note measurements and compare with the following:
(1)
Crankshaft bearing diameter: 2.75 inches (70 mm) maximum.
(2)
Crankshaft center locating bearing: 2.75 inches (70 mm).
(3)
Length of journal: 1.46 inches (37 mm) minimum.
(f)
Wear limit for ovality is 0.0008 inch (0.01 mm).
6-20
|

