 |
|||
|
|
|||
|
|
|||
| ||||||||||
|
|
 faulty ignition timing. You should recheck as
cracks, and other damage. If it is necessary to reuse
directed above.
the plugs, correct the contact gap to 0.030 inch.
(8) With the engine running at 140050
(5) Replace any spark plugs whose condition
rpm, you can check for proper spark advance with
is doubtful.
a timing light. The proper spark advance is in-
c. Installation.
dicated on the shroud by a 1/8 inch hole 230 before
(1) Make sure all spark plugs are gapped to
the vertical centerline on the number 1 and 3
0.030 inch before you install them.
cylinders. For easier recognition of the X-marked
(2) Install the spark plugs, using a torque
vane, you should whiten it with chalk or paint.
wrench. Tighten the spark plugs to 25 to 30 foot-
Connect the timing light to the number 1 spark
pounds torque.
plug and check that the indication on the flywheel
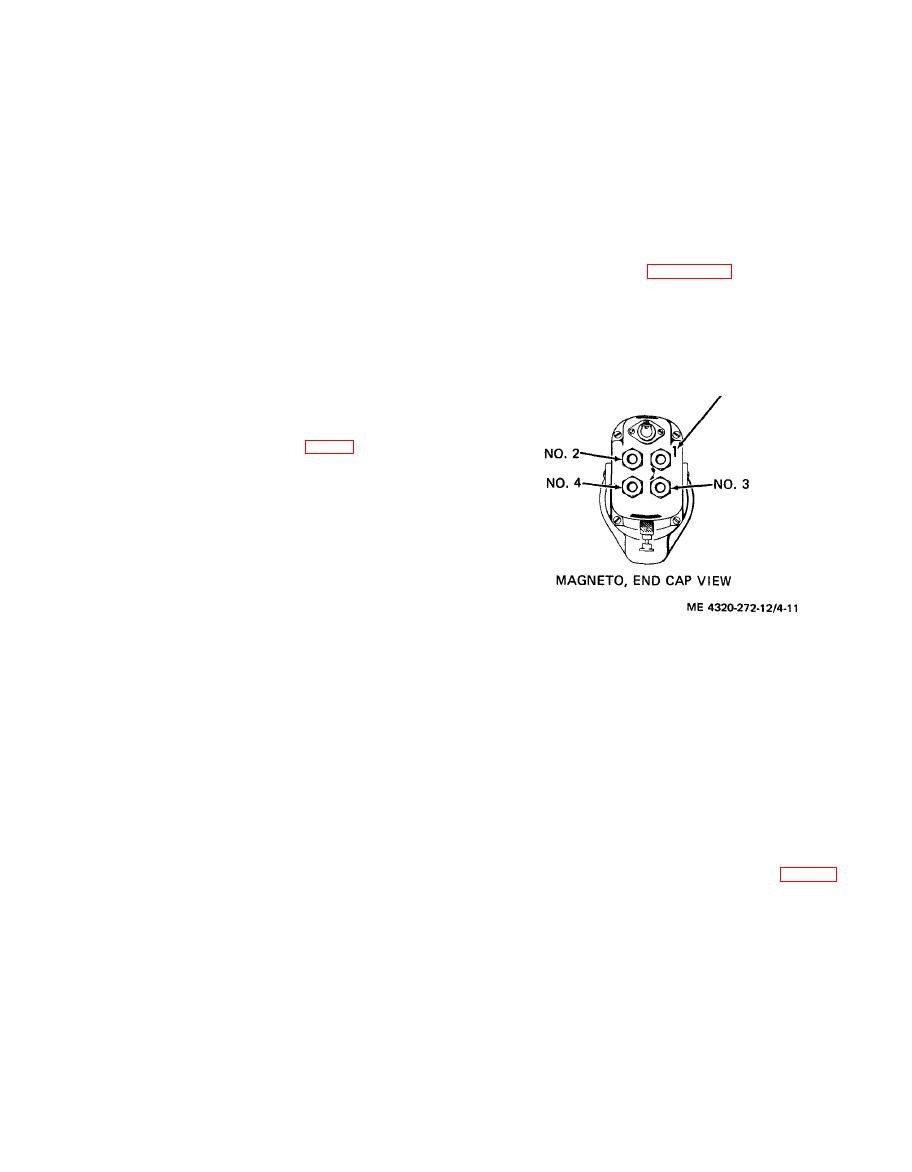
(3) Install the shielded spark plug cables on
is alined with the spark advance mark on the
the spark plugs. Make sure the leads are not in-
shroud. If it is not exactly alined, you can rotate
terchanged. Refer to figure 4-11 to assure proper
the magneto slightly until the correct indication is
magneto-to-spark plug wiring.
attained. Tighten the mounting hardware securely.
NO. 1 TERMINAL, UPPER RIGHT HAND, ON
a. Removal.
MAGNETO END CAP AS SHOWN. OTHER
(1) Use compressed air to blow dirt away from
TERMINALS FOLLOW FIRING ORDER IN
the spark plugs before removing them. This will
A CLOCKWISE ROTATION.
prevent dirt from entering the cylinders as you
remove the spark plugs.
(2) Disconnect the shielded spark plug cables
from the spark plugs (44, fig. 4-9) and remove the
spark plugs.
b. Cleaning and Inspection.
NOTE
It is normally more economical to replace the spark
plugs than for you to clean and regap them. It also
provides greater assurance that here are no hidden
cracks in the ceramic insulators which could cause
inspection instructions are given, however, in case it
is necessary for you to reuse the removed plugs.
WARNING
Clean all parts in a well-ventilated area.
Avoid inhalation of solvent fumes and
4-27. Starting Motor
prolonged exposure of the skin to
a. Removal. Remove the starting motor for
cleaning solvent. Wash exposed skin
replacement as follows:
thoroughly.
CAUTION
(1) Wipe the exterior of the spark plugs with a
Disconnect the battery cable from the
cloth dampened with cleaning solvent (fed. spec. P-
p o s i t i v e battery t e r m i n a l b e f o r e
D-680); dry thoroughly.
disconnecting any other electrical leads
(2) Check the ceramic insulators for cracks,
from the engine components. This will
porosity, and other damage.
prevent shorts which could damage the
(3) If the electrodes of the spark plugs are not
alternator, voltage regulator, and other
too badly burned, you can remove the scale and
parts.
other deposits from them. This can be done by a
(1) Disconnect the electrical lead (2, fig. 4-12)
sand-blast-type cleaner or with a contact file. Clean
to the starting motor (12) from the starter switch.
with compressed air to remove any residue.
(4) Inspect the electrodes for severe burning,
|
|
Privacy Statement - Press Release - Copyright Information. - Contact Us |
