 |
|||
|
|
|||
|
|
|||
| ||||||||||
|
|
 b. Cleaning and Inspection.
(1) Clean all parts with an approved cleaning
(1) Clean all parts with an approved cleaning
solvent. Take care to remove all particles from the
solvent; dry thoroughly.
screen.
(2) Inspect the blower housing for dents,
(2) Inspect the flywheel for cracks, distortion,
distortion, cracks, and punctures. Straighten minor
broken fins, and damaged keyway or bore. Check
dents and distortion. Replace if damaged beyond
the residual magnetism of the flywheel as directed
repair.
in paragraph 4-16 c (5). Replace the flywheel if it is
(3) Inspect the baffles for cracks, distortion,
damaged or has lost its magnetism.
and dents. Dents can be straightened if they will not
disrupt air flow after the repair is made. Replace
(3) Inspect the starter pulley for cracks, chips,
and distortion. Replace if damaged.
damaged parts.
c. Installation.
(4) Inspect the screen for distortion, holes,
and other damage; replace a damaged screen.
(1) Install the engine housing parts as shown
in figure 4-1, items 1 through 11. Make sure the air
(5) Replace the key if necessary. Remove all
burrs from the key, keyways, and flywheel and
has free passage around the engine when the parts
starter pulley bore before attempting to reinstall the
are installed.
parts.
(2) Install the spark plug cable on the spark
c. Installation.
plug (para 4-15 c).
(1) Position the key (18, fig. 4-1) on the
(3) Install the fuel tank, lines, and fittings,
crankshaft and install the flywheel (17) and starter
(para 4-19 c).
pulley (16). Hold the flywheel with a bar inserted
4-13. Flywheel
between the flywheel fins and install the washer
a. Removal.
(15) and nut (14). Tighten the nut to 45 foot-
(1) Remove the blower housing (para 4-12 a).
pounds.
(2) Use needle-nosed pliers to remove the
(2) Position the screen (13) in the seat of the
screen retainer (12, fig. 4-1) and screen (13) from
starter pulley and retain it with the screen retainer
the starter pulley (16).
(12).
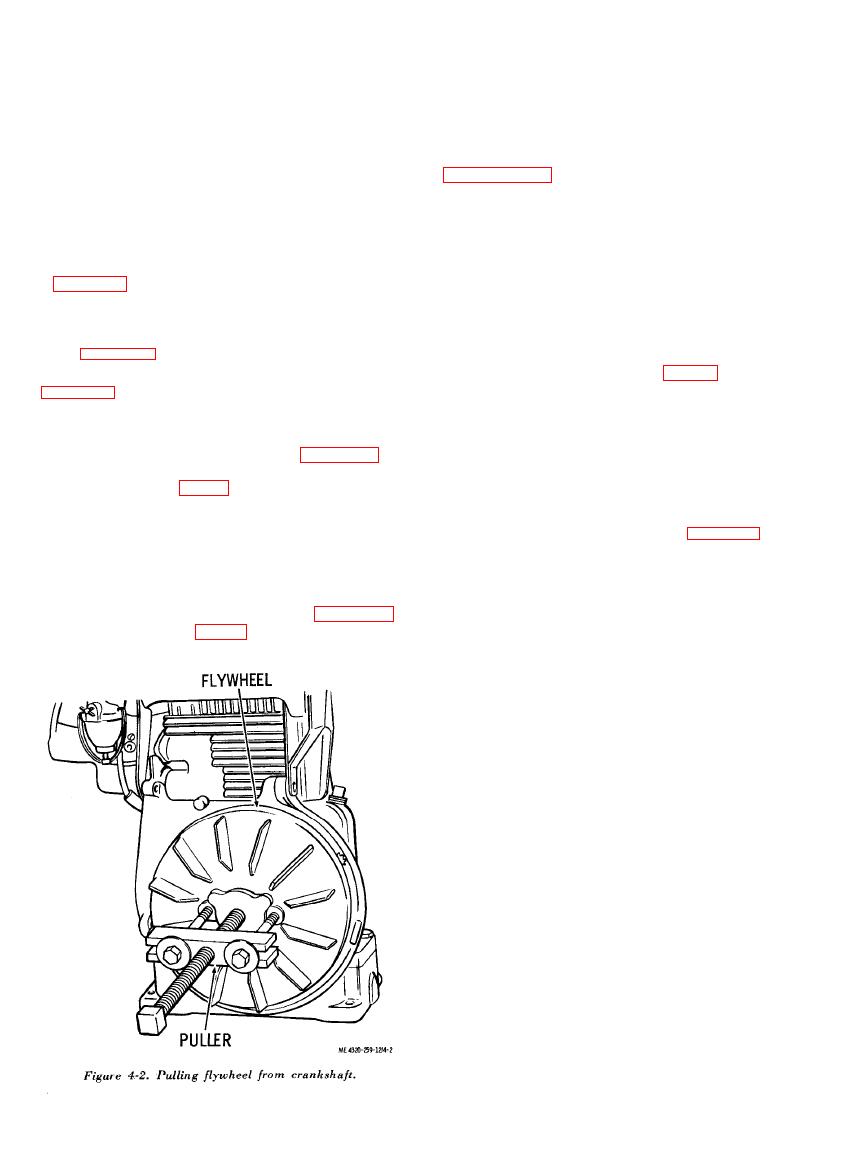
(3) When removing the nut (14), hold the
(3) Install the blower housing (para 4-12 c).
flywheel and crankshaft from rotating, using a bar
inserted in the flywheel cooling fins, Remove the
starter pulley.
(4) Pull the flywheel (17) from the
crankshaft, using a puller as shown in figure 4-2.
Remove the key (18, fig. 4-1).
|
|
Privacy Statement - Press Release - Copyright Information. - Contact Us |
