|
| |
TM 9-2350-253-34-2
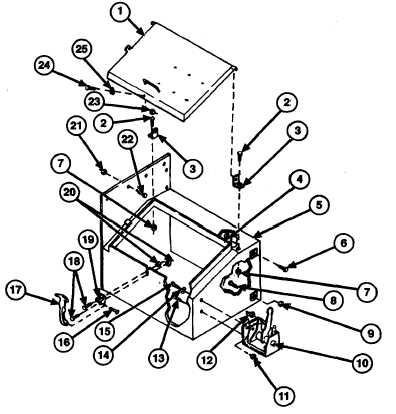
2-81. TOOL BOX ASSEMBLY REPAIR (continued).
d.
ASSEMBLY
1.
Install bracket (19) on tool box (5) with two screws (18) and new self-locking nuts (20).
2.
Install rubber catch (17) on bracket (19) with screw (16).
3.
Install catch (25) on cover (1) with screw (24) and new self-locking nut (23).
4.
Install cover (1) on tool box (5) with two screws (2), new self-locking nuts (7), and angle brackets (3).
e.
INSTALLATION
1.
Install tool box (5) on semitrailer with four mounting screws (22) and new self-locking nuts (21).
2.
Install two screws (6 and 8) and new self-locking nuts (4 and 9) on tool box (5).
3.
Install two screws (13 and 15), one washer (14), and two new self-locking nuts (1 1 and 12) on emergency
valve A control handle bracket (10) and tool box (5).
FOLLOW-ON MAINTENANCE:
•
Connect emergency valve A handle control cable (para 2-133).
•
Place tools in tool box (refer to TM 9-2330-398-10).
•
Disconnect ground (refer to TM 9-2330-398-10).
2-177
|