|
| |
TM 9-2330-398-24
2-53. EMERGENCY RELAY VALVE REPLACEMENT.
This Task Covers:
a. Removal
b. Installation
c. Test
Initial Setup:
Tool and Test Equipment:
Equipment Conditions:
• General mechanic's tool kit (Item 4, Appendix B)
• Semitrailer uncoupled (refer to TM 9-2330-398-10).
• Semitrailer bonded and grounded (refer to
Materials/Parts:
TM 9-2330-398-10).
• Soap (Item 28, Appendix C)
• Air reservoirs drained (refer to TM 9-2330-398-10).
a. REMOVAL
NOTE
Before removal, tag all hoses and lines for identification at installation.
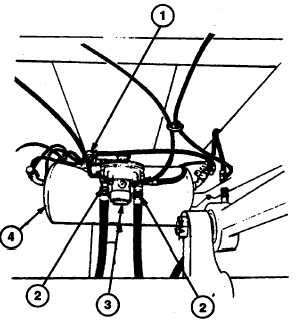
1. Disconnect hoses and tube fittings (1 and 2) from relay valve (3) on reservoir (4).
2. Remove relay valve (3) from nipple on reservoir (4).
b. INSTALLATION
1. Install relay valve (3) on nipple of reservoir (4).
2. Connect hoses and tube fittings (1 and 2) to
relay valve (3).
c. TEST
1. Connect prime mover to semitrailer and fill air
reservoirs.
NOTE
When prime mover brake pedal or
semitrailer
handbrake
lever
is
applied, air is delivered to emergency
relay valve. The emergency relay
valve releases air from primary brake
reservoir to brake chambers to set
the brakes.
2. Engage service brake and apply soapy water to exhaust port on top of emergency relay valve. If there is leakage,
replace relay valve.
3. Apply and release service brake pedal several times. Listen for immediate response from relay valve. If there is
hesitation in brake application and release, replace relay valve.
FOLLOW-ON MAINTENANCE:
• Disconnect ground (refer to TM-9-2330-398-10).
2-135
|

