 |
|||
|
|
|||
|
|
|||
| ||||||||||
|
|
 KEY to fig. 4-6:
4-20. Carburetor
a. Adjustment.
1.
Tube nut
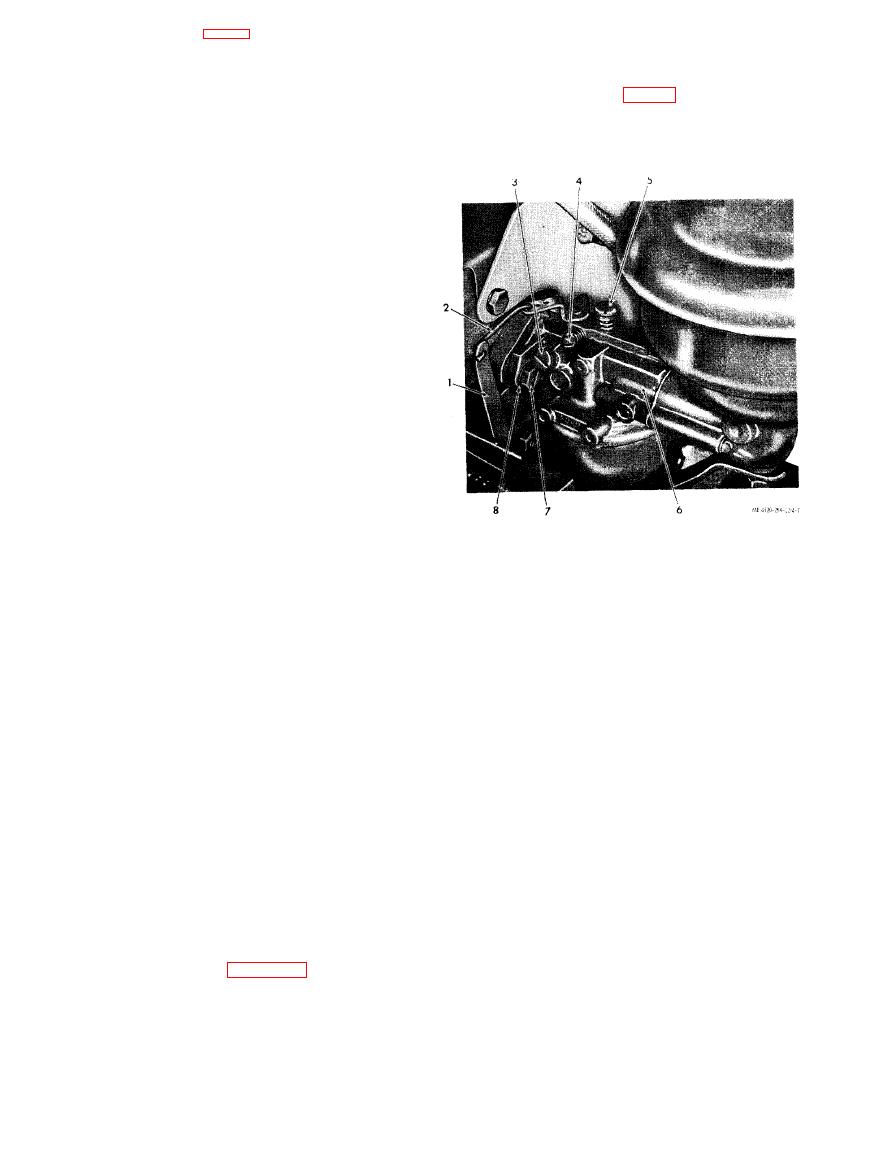
(1) With the engine stopped. turn the main
2.
Tube
fuel adjustment needle (5, fig. 4-7) clockwise until
3.
Elbow
4.
Bail
it just bottoms. Do not force the needle against its
5.
Bowl
seat or damage might result. Also turn the idle fuel
6.
Gasket
adjustment needle (3) clockwise until it is seated.
7.
Filter
8.
Housing
9.
Pipe nipple
10.
Inlet strainer
11.
Cap screw
12.
Nut
13.
Strap
14.
Cap screw
15.
Nut
16.
Strap
17.
Fuel tank
18.
Webbing
19.
Fuel tank bracket
b. Cleaning and Inspection.
Warning: The fuel tank is normallly
replaced if damaged. However, if expediency
requires that the fuel tank be repaired by any
method involving heat or flame, steam-clean
the tank thoroughly to assure that all traces of
gasoline are removed before starting repairs.
Failure to purge the tank of all traces of fuel
fumes before applying heat or flame may result
1.
Governor lever
in a severe explosion.
2.
Governor link
(1) Clean all parts with an approved cleaning
3.
Idle fuel adjustment needle
solvent. Flush the fuel line with solvent and blow it
4.
Idle speed adjustment
out with clean, filtered compressed air.
5.
Main fuel adjustment needle
6.
(2) Inspect the fuel tank for cracks, leaks, and
Carburetor
7.
Cap screw
severe dents. Make sure the cap and chain are
8.
Lock washer
present and are in good condition.
(3) Inspect the fuel strainer for a cracked
bowl or body, damaged threads, and distorted bowl
(2) Back out (counterclockwise) the main fuel
bail. Make sure the bowl glass is clear so that the
adjustment needle exactly two turns. Back out the
fuel is visible in the bowl. Check the fuel shutoff
idle fuel adjustment needle one and one-fourth
valve on the fuel strainer housing. Make sure it
turns. This is a preliminary setting.
operates freely and effectively.
(3) Start the engine and allow it to warm to
(4) Inspect the fuel line for cracks, dents,
operating temperature.
damaged tube nuts, clogging, and other damage;
(4) With the engine operating at full throttle
replace the fuel line.
and full load, turn in (clockwise) the main fuel
(5) Inspect the fuel tank straps for cracks,
adjustment needle until the engine starts to slow
distortion, and other damage; replace damaged
down because of a lean fuel mixture. Note the
straps.
position of the screw, then turn out (coun-
(6) Inspect a l l other parts for cracks,
terclockwise) the screw until the engine again starts
distortion, and damaged threads; replace damaged
to slow down, this time from an overly rich fuel
parts.
mixture. Note this setting. Adjust the main fuel
c. Reassembly and Installation.
adjustment needle so that it is positioned midway
(1) Reassemble and install the fuel tank, lines,
between the too rich and too lean settings.
and fittings as shown in figure 4-6.
(5) Allow the engine to operate at this setting
(2) After installation, fill the fuel tank with
and check that the engine operates smoothly as the
the required gasoline and open the shutoff cock.
load is added or decreased.
Check the entire system for leaks. Correct any leaks
before restoring the unit to service.
|
|
Privacy Statement - Press Release - Copyright Information. - Contact Us |
