 |
|||
|
|
|||
|
|
|||
| ||||||||||
|
|
 (5) Install new gasket and seal. Replace any
(2) Tighten nut (7) until the wheel bearing
defective part.
binds slightly when wheel is rotated, then back off nut
slowly until wheel rotates freely. Bend tang on washer
c. Reassembly and Installation.
(6) to lock the nut (7) in position.
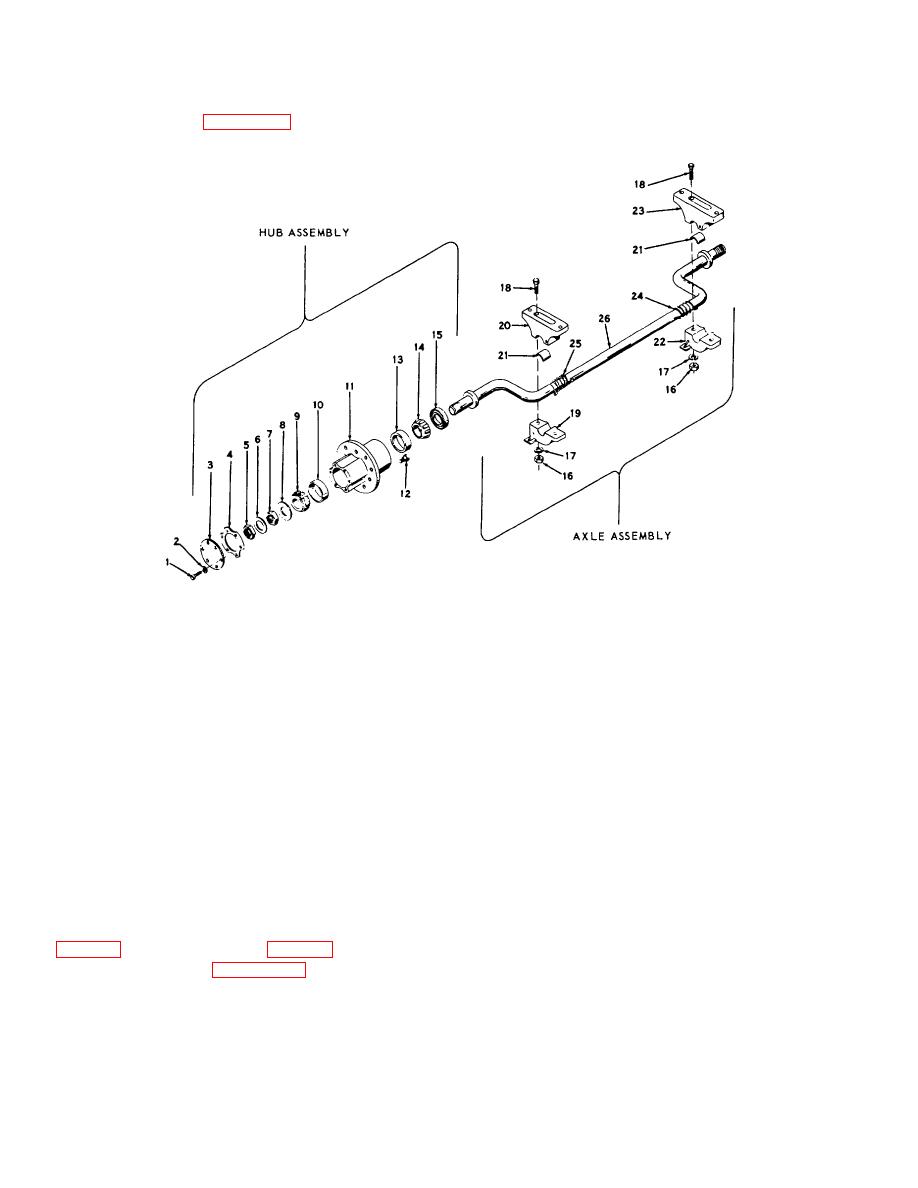
(1) Refer to figure 4-15 and reassemble and
(3) Complete reassembly and installation.
install the seal, bearings, and hub assembly.
NOTE
DO NOT REMOVE BEARING CUPS (10,13) UNLESS DAMAGED OR WORN. WHEN INSTALLING
NEW CUPS, EXERCISE CARE NOT TO BUR OR DAMAGE CUP. DO NOT REMOVE BOLTS (12)
FROM HUB ASSEMBLY (11) UNLESS DAMAGED.
ME 4320-242-14/4-15
1.
Capscrew
10. Bearing cup
19. Bracket, top, rh
2.
Lockwasher
11. Hub
20. Bracket, base, rh
3.
Cap, grease
12. Bolt
21. Insert
4.
Gasket
13. Bearing cup
22. Bracket, top Ih
5.
Nut
14. Bearing cone
23. Bracket, base, lh
6.
Washer, nut lock
15. Seal
24. Spring, Ih
7.
Nut
16. Nut
25. Spring, rh
8.
Washer, wheel bearing
17. Washer
26. Axle
9..
Bearing cone
18. Screw
Figure 4-15. Hub and axle assembly, exploded view.
4-34. Axle Assembly
(1) Clean all parts with solvent.
Dry
thoroughly.
a. Removal and Disassembly.
(2) Inspect inserts for pitting, grooving, and
(1) Remove the wheel and tire assemblies
excessive wear. Inspect springs for cracks, breaks, and
loss of tension.
(2) Refer to figure 4-15 and remove and
(3) Inspect brackets and axle for cracks,
disassemble the axle assembly in the numerical
breaks and other damage. Replace damaged and
sequence indicated.
missing hardware. Replace a defective part.
b. Cleaning, Inspection, and Repair.
4-24
|
|
Privacy Statement - Press Release - Copyright Information. - Contact Us |