 |
|||
|
|
|||
|
Page Title:
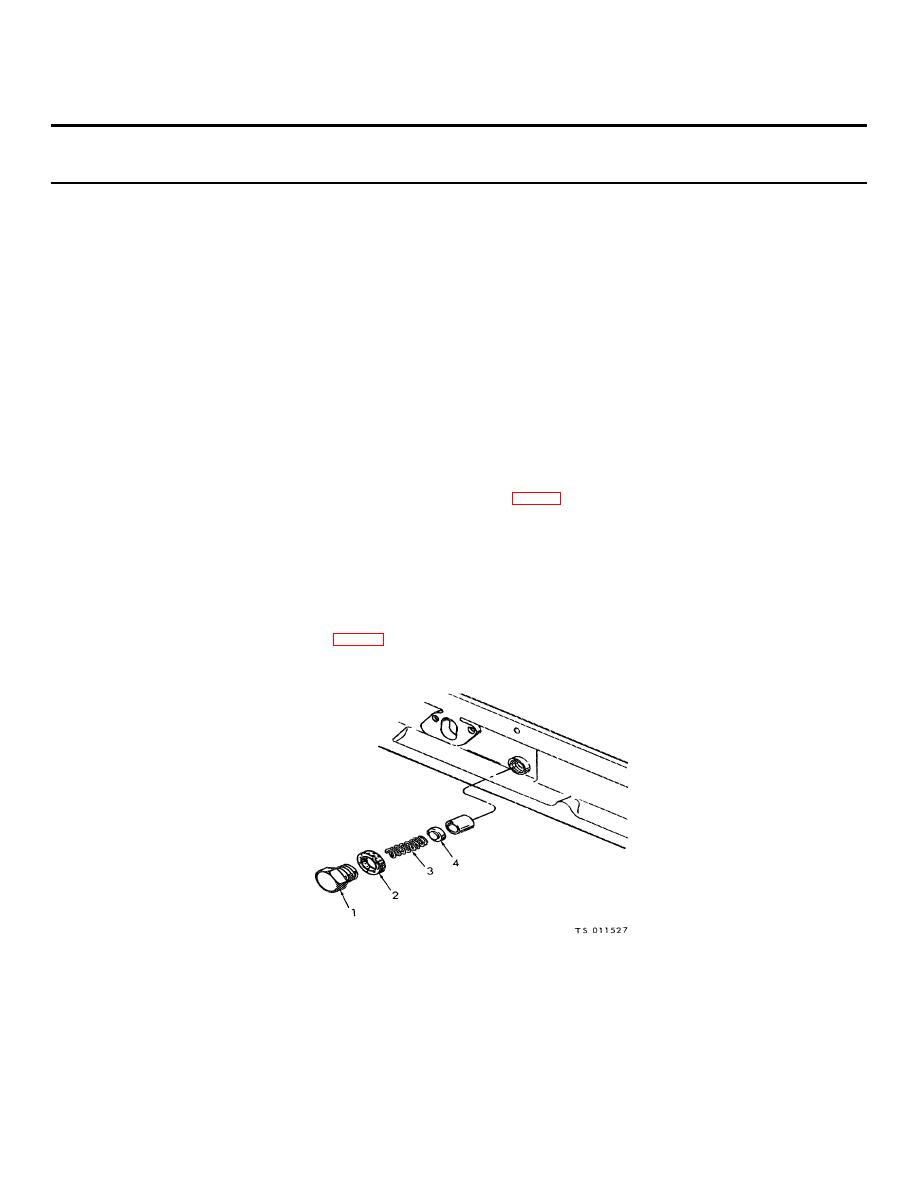
Figure 2-6. Oil pressure adjustment |
|
||
| ||||||||||
|
|
 TM 5-4320-234-34
Table 2-1. Troubleshooting - Continued
MALFUNCTION
TEST OR INSPECTION
CORRECTIVE ACTION
ENGINE CONTINUED
(4) Use a rope sling and a hoist to support the weight of the radiator before removing nuts (12), lockwashers (13), that secure the radiator to the
engine supports Remove nuts (12), lockwashers (13), and remove radiator (14) and liners (15).
b. Inspect all parts for cracks, leaking tubes or gasket.
CAUTION
Do not exceed 10 psi air pressure for radiator testing. Excess pressure will
damage the radiator. Make sure that you completely drain the radiator core before
testing. When testing at low pressure, it is possible that water within the core
could prevent air from passing out of small holes, and the leaks could remain
undetected.
c. Make sure the radiator is completely drained of coolant. Plug all openings, except one through which compressed air can he applied. Immerse
the radiator in a tank of water and apply 10 psi air pressure to the interior of the radiator. Check for air bubbles that could indicate leak. If leaks
are found, mark the areas for repairs.
Repair radiator.
(1) Repair leaks by soldering. Be sure that you o not block or retard circulation through any tubes. There shall be no
d
blocked tubes upon completion of repairs.
(2) Use a rope sling and a hoist and install lines (15, fig. 2-5), and radiator (14). Secure radiator to engine supports with
lockwashers (13) and nuts (12).
(3) Install fan shroud (11), and secure with flatwasher (10), lockwashers (9), and screws (8). Install supports (7 and 9) and
secure with lock-washers (5) and screws (4). Install fan guard (3) and secure with flatwashers (2) and screw (1).
(4) Install engine housing and oil cooler and coolant on the radiator. Service the engine coolant system.
3. OIL PRESSURE SAFETY SWITCH STOPS ENGINE OPERATION
Step 1. Check for improperly adjusted oil pressure regulator valve.
Start the engine and allow it to warm to operating temperature,. Check the engine oil pressure indicated on the oil pressure gage. At
idle speed the pressure must exceed 7 psi; at governed speed, it must be between 20 and 30 psi.
If the engine oil pressure is no within the required range, shut off the engine and adjust the oil pressure regulator valve.
t
(1) Remove plug (1, fig. 2-6) and gasket (2) from the carburetor side of the engine. Remove the valve spring (3) and
pressure adjusting washers (4).
1.
Plug
2.
Gasket
3.
Valve spring
4.
Washer
Figure 2-6. Oil pressure adjustment
2-9
|
|
Privacy Statement - Press Release - Copyright Information. - Contact Us |