 |
|||
|
|
|||
|
Page Title:
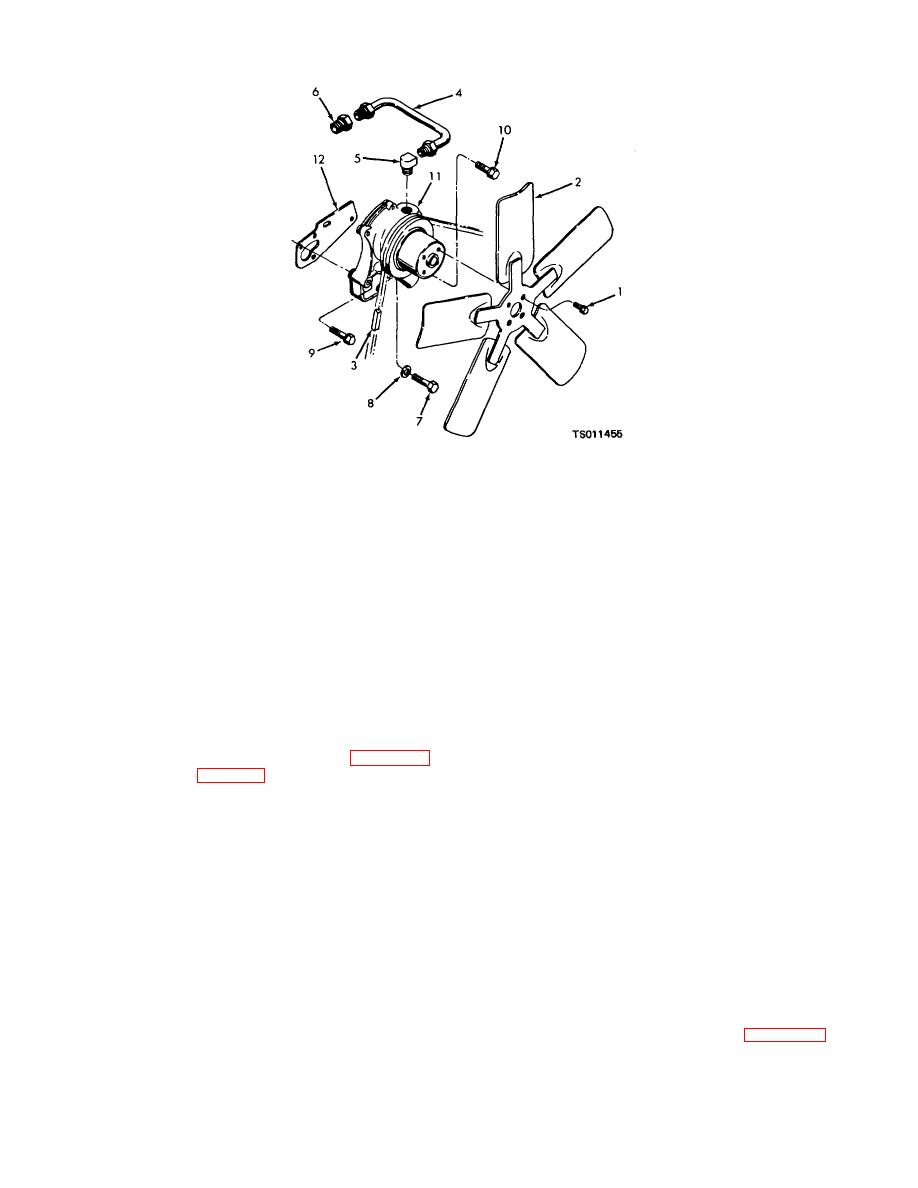
Figure 4-17. Water pump and cooling fan, exploded view. |
|
||
| ||||||||||
|
|
 1. Cap screw
2. Cooling fan
3. Fan belt
4. Bypass tube
5. Elbow
6. Adapter
7. Cap screw
8. Lock washer
9. Cap screw
10. Cap screw
11. Water pump
12. Gasket
Figure 4-17. Water pump and cooling fan, exploded view.
(4) Drain the coolant from the radiator and
(2) Clean the cooling fan and water pump with a
cylinder block. Disconnect coolant hoses (para 4- 30)
cloth dampened with a dry cleaning solvent (fed. spec.
and bypass tube (4, fig. 4-17) from the water pump.
P-D-680); dry thoroughly.
Remove the elbow (5) and adapter (6). Remove the
(3) Inspect the fan belt for cracks, brittleness,
three cap screws (7, 9, and 10), and lock washer (8)
severe glazing, and other damage; replace a damaged
that secure the water pump (11) to the cylinder block;
fan belt.
remove the water pump and gasket (12).
(4) Inspect the cooling fan for cracked, bent,
c. Cleaning and Inspection.
loose, or severely nicked fan blades, damaged or
(1) Wipe the fan belt with a clean, dry cloth.
elongated mounting holes, or other damage; replace a
WARNING
damaged cooling fan.
(5) Inspect the water pump for a cracked or
Clean all parts in a well-ventilated area. Avoid
distorted housing, damaged mounting flanges, and other
inhalation of solvent fumes and prolonged
damage. Check the rotation of the water pump shaft. It
exposure of skin to cleaning solvent. Wash
must rotate easily without catching or binding. Replace
exposed skin thoroughly. Dry cleaning solvent
a leaking or damaged water pump.
(fed. spec. P-D-680) used to clean parts is
d. Installation.
potentially dangerous to personnel and property.
(1) Installation of the water pump and cooling
Do not use near open flame or excessive heat.
fan is the reverse of removal. Refer to figure 4-17.
Flash point of solvent is 100 to 138 F (38 to
(2) Install the fan belt on the pulleys and
59 C).
4-31
|
|
Privacy Statement - Press Release - Copyright Information. - Contact Us |