|
| |
TM 10-4320-351-14
(5)
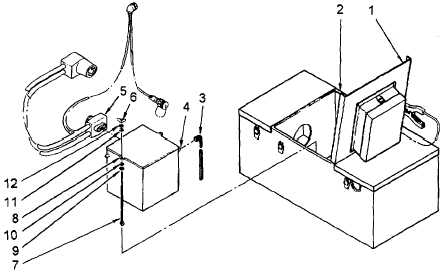
Apply corrosion preventive compound and attach battery cable (5) to battery.
(6)
Lower and latch the battery compartment cover (1).
Figure 4-24. Battery Replacement
4.15.2 Replace Control Box. (Refer to figure 4-25.)
This task consists of:
a.
Removal
b.
Installation
INITIAL SET-UP:
Tools:
Materials/Parts Required:
Tool Kit, General Mechanics
None
(Appendix B, Section III, Item 1)
Equipment Condition:
Accessory module removed from system
(para. 2.9)
a.
Removal.
(1)
At the accessory module, open center cover (1).
(2)
Disconnect control cable W201 (2) from control box. Install dust caps on connector and cable end.
(3)
Disconnect battery cable W202 (3) from control box. Install dust caps on connector and cable end.
(4)
Close center cover.
(5)
Remove the four cross tip screws (4) and washers (5) that secure the control box (6) to the accessory
module and remove the control box.
4-46
|

