|
| |
TM10-4320-324-14
5-21. Cooling Coil Replacement.
This task covers:
a.
Removal
c.
Cleaning/Inspection
b.
Installation
d.
Follow-on Maintenance
INITIAL SETUP:
Tools
Equipment Condition
Tool kit, general mechanics, item 35, section III,
Injector lines removed (para 4-41).
appendix B
Engine cowlings removed (para 5-19).
Cooling fan removed (para 5-20).
Materials/Parts
Cloth, lint free, item 3, appendix E
General Safety Instructions
Sleeve (2)- 121-6511
Wear personal protective equipment
Nut (2)- 223-2381
when using compressed air for cleaning.
Sleeve, rubber (4)- 121-6795
a.
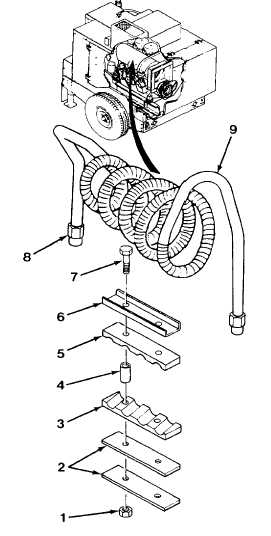
Removal.
(1)
Remove two nuts (1).
(2)
Remove two plates (2).
(3)
Remove rubber section (3).
(4)
Loosen tube (4) and pull away from rubber section (5).
(5)
Remove rubber section (5) and strip (6) from two bolts
(7).
(6)
Loosen two nuts (8) and remove cooling coil (9).
b.
Cleaning/Inspection.
Compressed air used for cleaning purposes will not
exceed 30 psi. Use only with effective chip guarding and
personal protective equipment (goggles/shield, gloves,
etc).
(1)
Blow clean, compressed air through coils to remove any
obstructions and across all coil surfaces.
5-66
|