 |
|||
|
|
|||
|
|
|||
| ||||||||||
|
|
 NOTE
b. Cleaning and Inspection.
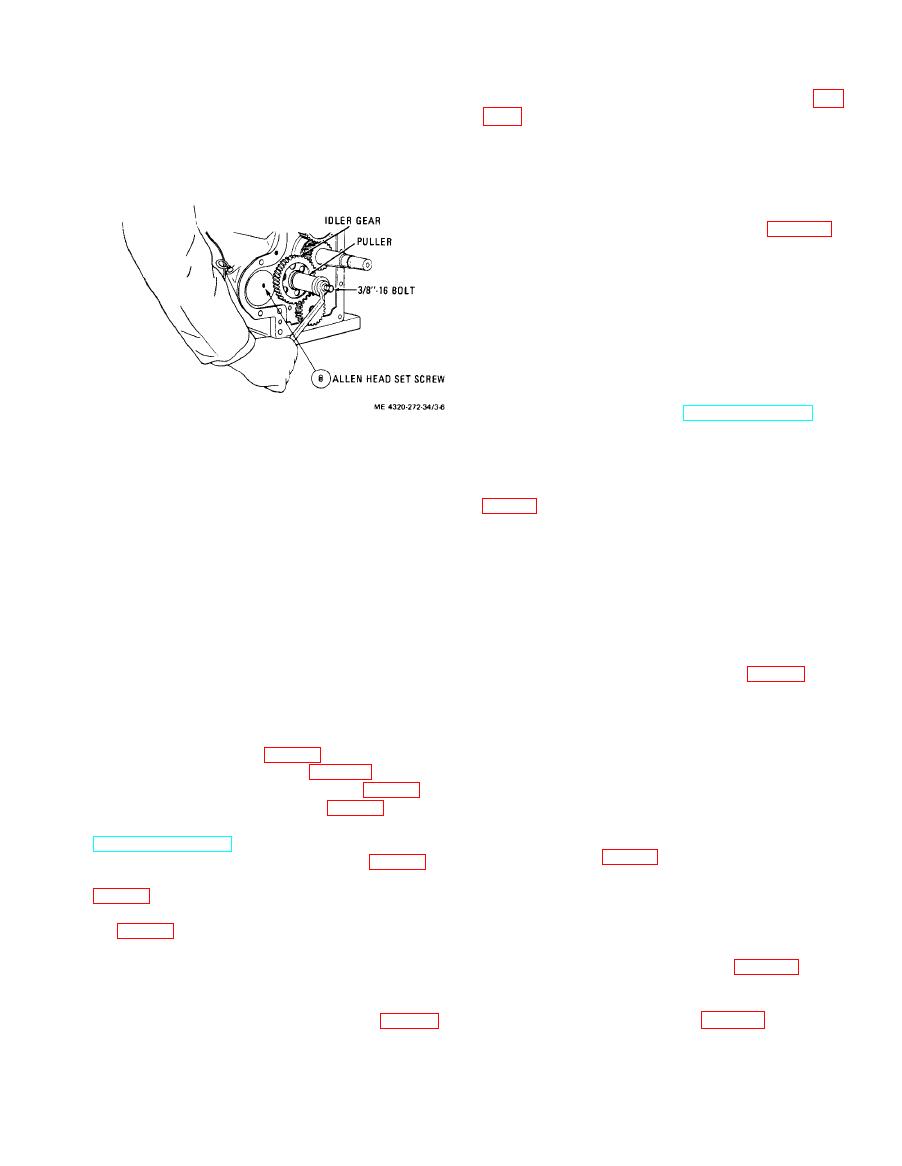
The hole in the end of the idler shaft is
(1) Discard and replace oil pan gasket (25, fig.
tapped 3/8"-16.
(2) Clean oil pan (24) and drain plug (1) with
cleaning solvent (fed. spec. P-D-680; dry thoroughly.
(3) Inspect the oil pan for cracks, severe dents,
holes, damaged threads, and other damage; replace a
damaged oil pan.
when you install oil pan (24). Install in reverse order of
removal. Be sure to note the following
(1) Install the oil pan with the deep end toward
the oil pump.
(2) Tighten the oil pan mounting screws (22)
to 6 to 9 foot-pounds torque. Tighten the screws
evenly and alternately in increments to prevent undue
stress on the oil pan.
(3) Refill crankcase with oil before restoring
the engine to service. Refer to LO 5-4320-272-12.
a. Removal.
c. Cleaning and Inspection.
(1) Clean the idler gear and shaft with cleaning
(1) To remove oil filer and breather cap (29,
solvent (fed. spec. P-D-680) and dry thoroughly.
pull at the same time.
(2) Inspct the idler gear for cracks, distortion,
chipped, cracked, or broken teeth. Replace idler gear if
(2) To remove oil filler tube, rotate and pull
damaged.
from engine block. Remove oil strainer (31).
(3) Check the idler gear shaft for cracks, distor-
(3) Remove oil level gage rod (32); remove
tion, or excessive wear of shaft or shoulder. Replace
adapter tube (33) if it is damaged.
worn or damaged shaft.
b. Cleaning and Inspection.
c. Installation.
(1) Clean all parts with cleaning solvent (fed.
(1) In installing the idler gear shaft, you must
spec. P-D-680); dry thoroughly.
be sure the oil groove in the shaft is facing up. Place the
(2) Inspect the oil strainer (31, fig. 3-13) for
idler gear on shaft before you drive shaft into
distortion, damaged sealing surfaces, holes in the
crankcase. Use a pastic hammer. Take care to main-
screen, clogging, or other damage. Replace a damaged
tain a 0.003- to 0.004-inch clearance between idler
strainer.
gear hub and shoulder to shaft. Retain shaft by
(3) Inspect the oil level gage rod (32), making
installing the setscrew (19, fig. 3-13).
sure it is straight and in good condition.
(2) Install the gear cover (para 3-10).
(4) Check all parts for cracks, dents, distor-
(3) Install the governor assembly (para 3-9).
tions, or other damage; replace damaged parts.
(4) Install the air shrouding (para 3-7).
c. Installation. Install oil filler and level gage in
(5) Install the carburetor and manifolds
the reverse order of removal. Use Loctite to secure
(TM 5-4320-272-12).
adapter tube (33, fig. 3-13) in engine block. The filler
(6) Install the flywheel alternator (para 3-6.
tube (30) is a push fit in the block. If necessary, rotate
(7) Install the flywheel assembly to the engine
the tube back and forth to seat it fully.
(8) Install the oil filter to the flywheel shroud-
3-14. Engine Ol Pump
ing (para 3-4).
a. Removal and Disassembly.
(1) Remove the engine oil pan (para 3-12).
3-12. Oil Pan
a. Removal.
NOTE
(1) If you have not already drained oil for
The engine support (7, fig. 3-13) is
engine overhaul, remove the drain plug (1, fig. 3-13)
mounted over the pipe plug and setcrew
and drain the engine oil into a suitable container.
which must be removed for oil pump
(2) Remove the 14 screws (22) and lock wash-
removal. You must remove the support
first, if you have not done so already.
remove the oil pan and gasket (25).
|
|
Privacy Statement - Press Release - Copyright Information. - Contact Us |
