|
| |
TM 9-2330-398-24
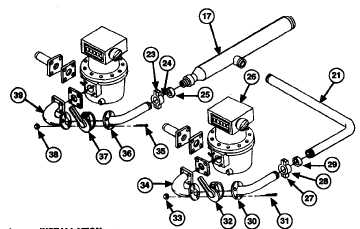
2-127. CABINET PIPING ASSEMBLY REPLACEMENT.
6.
Remove two screws (23), coupling (24), seal (25), and piping (17) from cabinet piping assembly (36). Discard
seal.
7.
Remove two screws (27), coupling (28), seal (29), and pipe (21) from cabinet piping (30). Discard seal.
8.
Remove six screws ((31) and self-locking nuts (33), valve R (32), and cabinet piping (30) from piping (34) on
volumetric meter (26). Discard self-locking nuts.
9.
Remove six screws (35) and self-locking nuts (38), valve P (37), and cabinet piping assembly (36) from piping (39)
on volumetric meter (22). Discard self-locking nuts.
b. INSTALLATION
1.
Install valve P (37) and cabinet piping assembly (36) on piping (39) on volumetric meter (22) with six screws (35)
and new self-locking nuts (38).
2.
Install valve R (32) and cabinet piping (30) on piping (34) on volumetric meter (26) with six screws (31) and new
self-locking nuts (33).
3.
Install cabinet piping (31), new seal (29), and coupling (28) on pipe (21) with two screws (27).
4.
Install cabinet piping assembly (36), new seal (25), and coupling (24) on piping (17) with two screws (23).
2-280
|