|
| |
TM 9-2330-272-14
4-42. AIR RESERVOIR REPLACEMENT.
This Task Covers:
a.
Removal
b. Installation
Initial Setup.
Equipment Conditions:
Materials/Parts:
l Relay valve removed (para 4-41).
l Antiseizing tape (Item 18, Appendix E)
l Four locknuts
Tools/Test Equipment:
l General mechanic’s tool kit
a.
REMOVAL
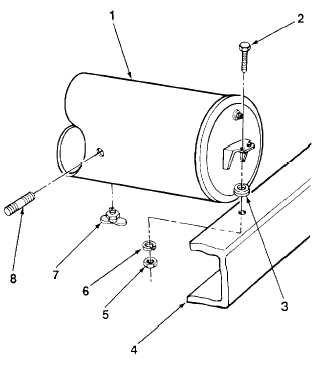
1.
Remove four locknuts (5), washers (6), grommets
(3), screws (2), and air reservoir (1) from cross-
members (4). Discard locknuts.
2.
Remove nipple (8) and draincock (7) from air
reservoir (1).
b.
INSTALLATION
1.
Apply antiseizing tape to draincock (7) and nipple (8) and install on air reservoir (1).
2.
Install air reservoir (1) on crossmembers (4) with four screws (2), grommets (3), washers (6), and new locknuts
(5).
FOLLOW-ON TASKS:
l Install relay valve (para 4-41).
TA702736
4-78
|