|
| |
TM 5-4320-313-14
(2) Clean all oil passages.
(3) Allow to dry.
c. Inspection.
(1) Use a straight edge and check the crankcase lengthwise and across cylinder for warpage. Replace
crankcase if warped.
(2) Inspect all internal threads for stripping or peening.
(3) Inspect for broken or damaged studs.
d. Repair. Repair is limited to replacement of damaged components.
e. Reassembly.
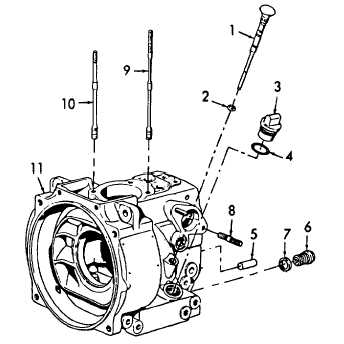
(1) Install two studs (10 and 9) into crankcase (11).
(2) Install two studs (8) into crankcase (11).
(3) Position new packing (7) on oil drain plug (6). Install oil drain plug (6). (4) Install two pins (5).
(5) Position new packing (4) on oil fill cap (3). Install oil fill cap (3).
(6) Position new packing (2) on oil dipstick (1). Install oil dipstick (1).
(7) Refer to paragraph 6-6 and install the crankshaft.
Figure 6-14. Crankcase Disassembly/Reassembly.
6-25/(6-26 Blank)
|