|
| |
TM 5-4320-306-24
2-13. TEST/REPLACE/REPAIR BATTERY CABLE ASSEMBLIES, BATTERIES, AND CHARGING RECEPTACLE
(Continued)
WARNING
Avoid making contact across the battery terminals. This can result in severe arcing which could
cause an explosion resulting in bodily injury.
CAUTION
Disconnect battery cable from negative battery post before disconnecting any other leads from
engine components. This precaution will prevent short circuits which could damage the
alternator, voltage regulator, or other electrical components. When removing battery cable, use
battery terminal puller to remove loosened terminal lugs. Forcing battery terminal lugs off without
using puller may damage the battery posts. Never disconnect battery while alternator is operating.
Never attempt to polarize the alternator.
2
Loosen nut (2) on terminal lug (3) Remove negative battery cable assembly (4) from negative battery post (5)
using battery terminal puller.
3
Loosen nut (6) on terminal lug (7) Remove positive battery cable assembly (8) from positive battery post (9) using
battery terminal puller
4
Loosen nuts (10) on terminal lugs (11) Remove jumper battery cable assembly (12) from positive battery post (13)
and negative battery post (14) using battery terminal puller
5
Lift and remove batteries (15) from battery box (16)
6
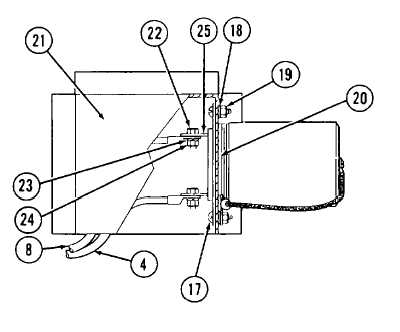
Remove screws (17), lockwashers (18), and nuts (19) that secure charging receptacle (20) in bracket (21 ).
7
Push receptacle (20) inside bracket (21) and remove it through the bottom of the bracket
8
Remove screws (22), lockwashers (23), and nuts (24) that secure positive and negative battery cables (8 and 4)
to receptacle terminals(25)
2-33
|