|
| |
TM 5-4320-306-24
2-29. REPLACE/REPAIR OIL DRAIN ASSEMBLY
This task covers:
a. Removal
c.
Repair
b.
Cleaning/Inspection
d.
Installation
INITIAL SETUP:
Tools
Equipment
Condition
Shop equipment, automotive maintenance
Para
Condition Description
and repair, common no 1
Engine oil drained
Tool kit, general mechanics automotive
2-22
Right and left side panels, air duct,
Materials/Parts
and bottom rear panel removed
from engine cover frame
Diesel fuel oil (Item 6, Appendix C)
Plywood board 1/8 x 19 x 48 inches
Special Environmental Conditions
(3 2 x 482 6 x 1219 2 mm)
Well-ventilated area required for cleaning
REMOVAL
1
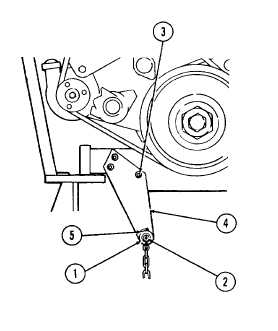
Remove pipe coupling (1) from oil drain (2) Do not disassemble the chain and coupling from the engine unless
replacement is required
2
From the rear end of the skid, slide a plywood board, approximately 1/8 x 19 x 48 inches (3 2 x 482 6 x 1219.2
mm) between the oil pan and the fuel tank Be sure the board does not rest on, crimp, or damage any fuel lines or
fittings Place the board on top of the fuel tank to protect it from damage during removal of the oil drain assembly
3
Remove cap screws, washers, and lockwashers (3) from oil drain support bracket (4). With the bracket still
attached to the oil drain pipe, rest the bracket on the plywood board.
4
Loosen hose clamp (5), and remove support bracket (4) and hose clamp from the oil drain pipe
2-103
|

