|
| |
TM 5-4320-305-24
4-4. REPAIR INJECTION PUMP (Continued)
79 Remove clevis (116) and shaft (117) as an assembly.
80 Remove threaded bushing (118).
81 Disassemble clevis (116) by removing spring-loaded retainer (119), compression springs (120, 121, and 122), and
spring capsule (123).
82 Slide shaft (117) from clevis (116).
83 Remove sliding pad (124) from clevis (116).
84 Remove nut (125) and threaded pin (126).
85 Remove two bolts (127) and two washers (128).
86 Remove bracket (129) and two washers (130).
87 Remove bolt (131).
88 Remove lockwasher (132) and washer (133).
89 Remove control lever (134).
90 Remove washers (135 and 136).
91 Remove C-clip (137). Remove bearing bushing (138) and washer (139).
92 Remove capsule (140).
93 Remove C-clip (141). Remove bearing bushing (142) and washer (143).
94 Remove screw plug (144).
95 Remove lever (145). Remove screw (146) from lever.
REPAIR:
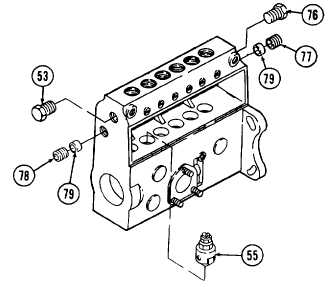
1 Inspect injection pump housing for cracks, distortion, or
thread damage. Clean up rough barrel seats in
housing using light cuts with barrel seat cutter KDEP
2995. If other defects are found, replace housing
along with screw plug (53), screw plug (76), guide
bushing (77), threaded ring (78), and two rings (79) as
an assembly.
2 Inspect six roller tappet assemblies (55) by rotating
roller and checking that it turns smoothly without
wobble. Also check for flat spots, pitting, scratches, or
cracks. If defects are found, repair as follows:
4-15
|