|
| |
TM 5-4320-305-24
2-29. REPLACE/REPAIR OIL DRAIN ASSEMBLY(Continued)
REPAIR:
1
Repair minor damage to support bracket. File nicks or burrs. Remove rust with sandpaper, then clean.
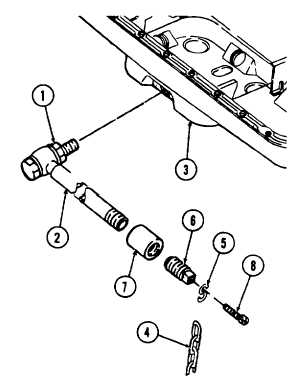
2 Straighten minor bends in oil drain assembly (2). Replace if damage that restricts oil flow or causes leaks at
connections cannot be repaired. Replace damaged or bent pipes, or pipes that cannot be cleaned.
3 Repair threads by running tap or die along threads to remove burrs. Replace the component if more than 25% of
the thread is lost due to damage or during repair.
4 Replace damaged chain (4), S-hook (5), plug (6), coupling (7), or screw (8).
INSTALLATION:
1 If chain (4), S-hooks (5), plug (6), coupling (7), or screw (8) have been repaired or replaced, attach S-hooks (5) to
each end of chain (4) and crimp; assemble coupling (7) and plug (6) and secure one S-hook (5) to plug (6) with
screw (8). Attach the other S-hook to the trailer frame and crimp.
2 Secure oil drain assembly (2) to oil pan (3) and tighten adapter (1).
2-115
|