|
| |
TM 5-4320-305-24
2-28. REPLACE/REPAIR EXHAUST SYSTEM (Continued)
CLEANING/INSPECTION:
WARNING
Death or serious injury could occur if diesel fuel oil is not handled carefully. Use in a well-
ventilated area away from open flame, arcing equipment, ignition sources, heaters, or excessive
heat. Always store fuel in proper, marked containers. DO NOT SMOKE.
Death or serious injury could occur if compressed air is directed against the skin. Do not use
compressed air for cleaning or drying unless the pressure is/has been reduced to 30 psi (2.11
kgcm2) or less. When working with compressed air always use chip guards, eye protection, and
other personal protective equipment.
1
Clean exhaust guard, muffler guard, spark arrestor, exhaust elbow, mounting bands, exhaust pipe, muffler
bracket, and exhaust elbow flange with diesel fuel oil and dry with compressed air. Inspect for minor rust,
corrosion, or other damage. Replace if severely rusted or damaged.
2 Inspect spark arrestor fins for damage or erosion that would prevent gas flow or allow sparks to escape. Replace
if fins are severely damaged or eroded.
REPAIR:
1 Repair minor dents, rust, or corrosion on exhaust guard, muffler guard, spark arrestor, exhaust elbow, exhaust
pipe, or exhaust elbow flange. If exhaust elbow flange is cracked or bent it must be replaced.
2 Straighten or replace bent clamps, mounting bands, or muffler bracket.
3 Replace muffler if holes or tears are present or if
severely dented or corroded.
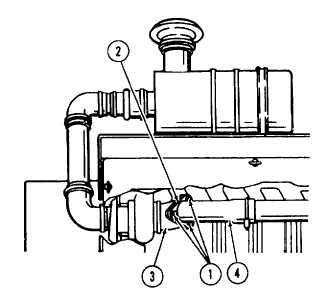
INSTALLATION:
1 Install exhaust elbow flange (2) on exhaust elbow
(4).
2 Install gaskets and washers on turbine elbow (3).
3 Install bolts and nuts (1) (three sets) to secure
exhaust elbow (4) and exhaust elbow flange (2) to
turbine elbow (3). Only tighten bolts and nuts (1)
enough to hold parts in position.
2-110
|