|
| |
TM 5-4320-305-24
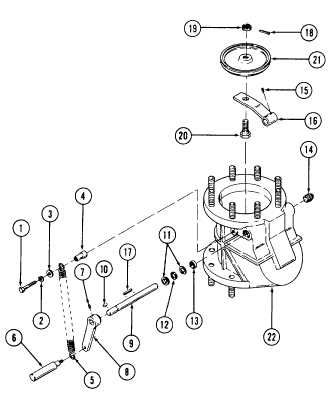
2-21. REPLACE/REPAIR DISCHARGE CHECK VALVE ASSEMBLY
This task covers:
a. Disassembly
c. Assembly
b. Cleaning/Inspection/Repair
INITIAL SETUP
Tools
Equipment
Condition
Shop equipment, automotive maintenance
Para
Condition Description
and repair, common no. 1
Tool kit, general mechanics automotive
2-19
Discharge check valve assembly re-
moved from discharge manifold
Materials/Parts
assembly.
Crocus abrasive cloth (Item 1, Appendix C)
Sealing compound (Item 15, Appendix C)
DISASSEMBLY:
1 Remove cap screw (1), lockwasher (2), washer (3),
and spacer sleeve (4).
2 Disconnect extension spring (5) from spacer sleeve
(4).
3 Unscrew extension handle (6) and remove extension
spring (5).
4 Loosen setscrew (7) and slide handle lever (8) from
shaft (9).
5 Remove woodruff key (10).
6
Remove retaining rings (11), friction ring (12), and
shaft seal (13). Discard friction ring (12) and shaft
seal (13).
7 Remove pipe plug (14).
8 Loosen setscrews (15) in valve arm (16) and pull out
shaft (9).
9 Remove key (17).
10 Remove cotter pin (18) from nut (19).
11 Remove nut (19) and shoulder bolt (20).
12 Remove valve seal disc (21) and valve arm (16).
2-86
|