|
| |
TM 5-4320-305-24
2-20. REPLACE/REPAIR AIR VALVE COVER ASSEMBLY (Continued)
CLEANING/INSPECTION:
WARNING
Dry cleaning solvent P-D-680 (safety or Stoddard's Solvent) is
potentially dangerous. Avoid repeated and prolonged breathing of
vapors and skin contact with the liquid. Do not use near open
flame, arcing equipment, or other ignition source. Always wear eye
protection and protective clothing. The flash point of P-D-680 is
1000 to 138°F (38° to 59°C).
Death or serious injury could occur if compressed air is directed
against the skin. Do not use compressed air for cleaning or drying
unless the pressure is/has been reduced to 30 psi (2.11 kgcm2 ) or
less. When working with compressed air always use chip guards,
eye protection, and other personal protective equipment.
1 Clean all parts with dry cleaning solvent. Dry with compressed air.
2 Inspect shutoff valve (2), bushings (3 and 5), and 90-degree elbows (1 and 4) for cracks, rust, corrosion, and for
damaged or stripped threads. Replace parts if severely damaged or rusted.
3 Inspect air valve cover (7) for cracks, rust, or corrosion, and for damaged or stripped threads. Inspect mounting
surface. Make sure it is smooth and flat with no nicks or burrs.
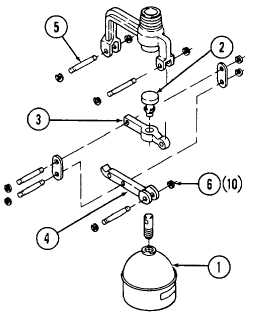
4 Inspect air release valve for rust or corrosion. Inspect
float (1) for holes and cracks. Inspect needle (2) and
seat for wear, grooves, or ridges. Check all threads
for damage. Check levers (3 and 4) and lever pins
(5) for straightness. Check that lever pins (5) and
retaining rings (6) are secure. Check that all parts
move freely. Replace air release valve if any parts
are severely dam- aged.
REPAIR:
1 Repair minor nicks or burrs on air valve cover (7) and/or smooth out mounting surface with crocus abrasive cloth.
Clean interior or mounting surface. Clean and refinish outside surface. Remove only a minimal amount of surface
material; replace if necessary.
2-84
|