|
| |
TM 07661B-14/1
APPENDIX A
up to align with handle in open position.
(12)
Position handle over handle bracket, align holes in bushings with those in cam, and install square pin (2).
(13)
Put handle in closed position and install roll pin (3).
(14)
Place handle in open position. Turn handle bracket until resistance is felt when handle is at 90 body
center line.
Hold handle and tighten lock nut. Turn handle to proper location. See figure 3-5. Tighten set screw.
(15)
Install pressure gage into port on valve body and tighten securely.
A 3-36. HOSE REEL. The hose reel on the extinguisher and the remote hose reel are identical except for the guide
roller assembly which is used only on the main hose reel.
Repair procedures are the same for both, except as noted.
NOTE
Make sure hose is removed from hose reel before disassembling.
a.
Disassembly. (figure 3-23)
(1)
Hose reel, extinguisher only: Remove guide roller and mounting bracket as an assembly by removing four
bolts (43), flatwasher (46), lockwashers (44), and nuts (45).
(2)
Remove chain guard (23) by removing two bolts (24), along with flat washers (25).
(3)
Locate master link in chain (22). Remove master link and chain.
(4)
Remove bolts (12) and lockwashers (26) from bearing housing (13) on both sides of reel drum. Remove
top bearing housings.
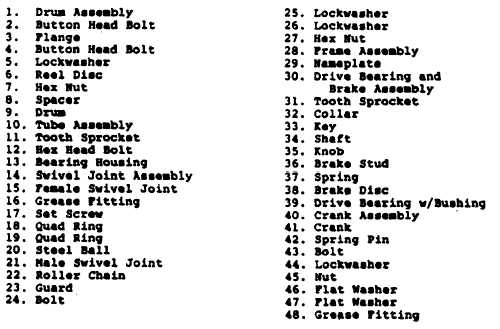
LEGEND FOR FIGURE 3-23
A 3-48
|

