|
| |
TM 10-4320-348-14
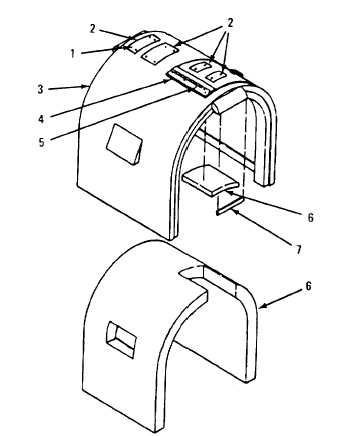
Figure 4-7. Sound Enclosure Cover Assembly
(5)
Let set for 2 to 3 minutes.
(6)
Using putty knife, peel adhesive backing from surface of sound enclosure cover assembly (3). Apply
additional solvent as needed.
(7)
Remove rubber channels (7) from sound enclosure cover (6).
b.
Repair
Repair is limited to replacement of defective parts.
c.
Installation
(1)
To install acoustical foam (6), wipe surface area of sound enclosure cover assembly (3) with a clean cloth
dampened in solvent, and immediately wipe solvent from surface with a clean dry cloth.
(2)
Fabricate appropriate acoustical foam (6).
(3)
Peel off protective backing.
(4)
Place acoustical foam (6) over prepared areas, in correct position, and press firmly in place.
(5)
Install rubber channel (7) onto sound enclosure cover (6).
4-22
|