|
| |
TM 9-2330-398-24
2-50. SLACK ADJUSTER REPLACEMENT (continued).
b. CLEANING AND INSPECTION
NOTE
Do not use solvents or soaps and water for cleaning.
1.
Clean slack adjuster, splines of camshaft, and other metal parts using stiff fiber brush, and wipe clean.
2.
Inspect slack adjuster for bent, broken, loose, or misaligned brake actuator push rods and cracked or damaged
brake actuator brackets. Replace slack adjuster if damaged.
c. INSTALLATION
1.
Install yoke (2), yoke pin (11), link pin (12), and two washers (10 and 13) and new cotter pins (1 and 14) on slack
adjuster (6).
2.
Install slack adjuster (6) and new retaining ring (8) on end of camshaft (7).
3.
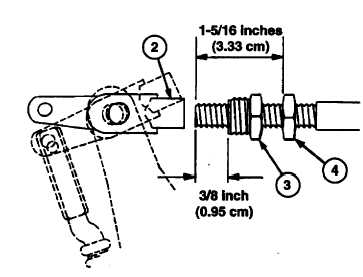
Install jamnut (4) approximately 1-5/16 inches ( 3.33 cm) from end of push rod (5).
4.
Install yoke adapter (3) on push rod (5) approximately 3(8 inch (0.95 cm) from end of push rod (5).
5.
Turn manual adjustment hex (9) clockwise until yoke adapter (3) extends into bore of yoke (2) approximately 1/8
inch (0.32 cm). Thread adapter into yoke and tighten to 10 Ib-ft (13.56 Nom).
6.
Tighten jamnut (4) between 400 and 600 in-ft (45 and 68 Nom).
2-129
|