|
| |
TM 9-2330-398-24
2-29.
MARKER LIGHT REPLACEMENT.
This Task Covers:
a.
Removal
b.
Installation
Initial Setup:
Tools/Test Equipment:
Equipment Conditions:
• General mechanic's tool kit (Item 4,
• Semitrailer uncoupled (refer to TM 9-2330-3910).
Appendix B)
• Negative battery cable disconnected (para 2-33).
• Marker light LED and lens removed (para 2-28).
Materials/Parts:
• Gasket (item 73, Appendix F)
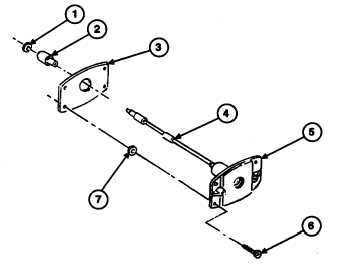
a.
REMOVAL
1. Remove four screws (6) and washers (7) from marker light body (5).
2. Disconnect marker light lead (4) from semitrailer, and remove marker light body (5), lead (4), and gasket (3) from
semitrailer. Discard gasket.
3. Remove washer (1) and shell (2) from lead (4).
b.
INSTALLATION
1. Install shell (2) and washer (1) on lead (4).
2. Connect marker light lead (4) to semitrailer.
3. Install new gasket (3), lead (4), and marker light
body (5) on semitrailer with four screws (6) and
washers (7).
FOLLOW-ON MAINTENANCE:
• Install marker light LED and lens (para 2-28.
• Connect negative battery cable (para 2-33).
2-72
|