|
| |
Section XIV. FILTER-SEPARATOR MAINTENANCE
TM 9-2330-272-14
Page
Paragraph Title
Number
Filter-separator Replacement (M131A4C and M131A5C Early Model) . . . . . . . . . . . . . . . . . . . . . . . . . . . . .
Filter-separator Replacement (M131A5C Late Model) . . . . . . . . . . . . . . . . . . . . . . . . . . . . . . . . . . . . . . . . . .
Filter-separator Servicing (M131A4C) . . . . . . . . . . . . . . . . . . . . . . . . . . . . . . . . . . . . . . . . . . . . . . . . . . . . . . .
Filter-separator Servicing (M131A5C Early Model), . . . . . . . . . . . . . . . . . . . . . . . . . . . . . . . . . . . . . . . . . . . . .
Filter-separator Servicing (M131A5C Late Model) . . . . . . . . . . . . . . . . . . . . . . . . . . . . . . . . . . . . . . . . . . . . . .
Float Assembly Replacement . . . . . . . . . . . . . . . . . . . . . . . . . . . . . . . . . . . . . . . . . . . . . . . . . . . . . . . . . . . .
Pressure Gage Replacement (M131A4C) . . . . . . . . . . . . . . . . . . . . . . . . . . . . . . . . . . . . . . . . . . . . . . . . . . .
4-83. PRESSURE GAGE REPLACEMENT (M131A4C).
This Task Covers: Replacement
Initial Setup:
Materials/Parts:
Tools/Test Equlpment:
Antiseizing tape (item 18, Appendix E)
General mechanic’s tool kit
4-176
4-178
4-179
4-182
4-185
4-188
4-175
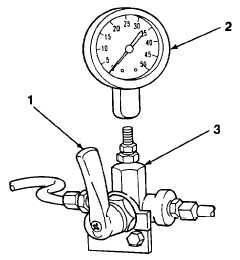
1.
Ensure that handle (1) is in closed position.
2.
Remove pressure gage (2) from elbow (3) by
turning pressure gage counterclockwise.
3.
Apply antiseizing tape to threads of elbow (3).
Install pressure gage (2) on elbow by turning
pressure gage clockwise.
TA702805
4-175
|