|
| |
TM 9-2330-272-14
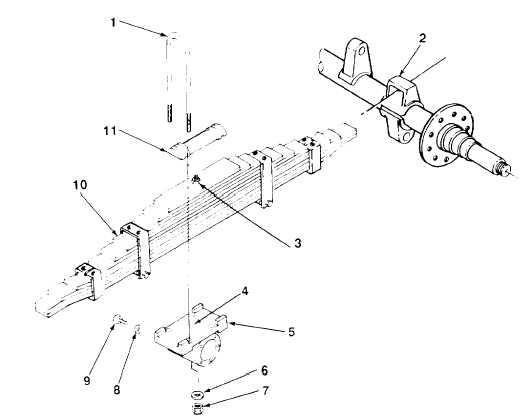
4-52. SPRING REPLACEMENT (Con’t).
9.
Move rear axle rearward until end
10.
Use a suitable lifting device to lift
of spring (10) clears guide bracket (2).
spring (10) from guide bracket (2) on forward-rear axle.
b.
INSTALLATION
1.
Lubricate spring bearing plate. Insert end of spring (10), larger leaf down, into guide bracket (2) on forward-rear
axle.
2.
Position spring (10) on spring seat (5) so center bolt of spring is over recess (4) in spring seat. Seat spring firmly.
3.
Position spring seat saddle (11) on spring (10). Ensure that nut (3) on center bolt fits into recess on spring
saddle.
4.
Install two U-bolts (1) on spring (10) and spring seat (5) with four new Iockwashers (6) and nuts (7). Torque nuts to
200-320 Ib.-ft. (271-434 N•m).
5.
Install two new Iockwashers (8) and screws (9) on spring seat (5). Torque screws to 650-750 Ib.-ft.
(881-1017 N•m).
6.
Move rear axle forward and install spring (10) in guide bracket (2) on forward-rear axle. Release jacks after
spring clears guide bracket.
TA702758
4-105
|