|
| |
TM 5-4320-313-14
c. Inspection.
(1) Inspect gear and pinion for damaged or chipped teeth.
(2) Inspect bushing for excessive wear.
(3) Inspect housing for cracks.
(4) Replace any damaged component.
d. Installation.
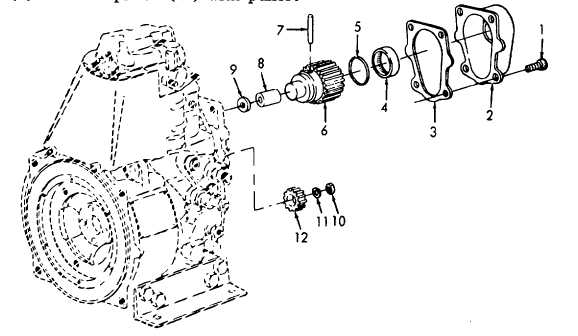
(1) Install pinion (12) onto camshaft. Secure with washer (11) and nut (10) Tighten nut (10) securely.
NOTE
Make sure timing marks on pinion (12) and gear wheel (6) are matched.
(2) Install disc (9) into timing cover housing with the graphite side of disc facing outward.
(3) Install bushing (8) into timing cover housing.
(4) Install pin (7) onto gear wheel (6).
(5) Lubricate housing (2) dry bushing with a small amount grease MIL-G10924.
(6) Install needle bearing (4), new oil seal (5), and gear wheel (6) into housing (2).
(6) Fill housing (2) with 3 1/2 ounces (100 g) of warm grease MIL-G- 10789.
(7) Install new gasket (3) and housing (2) onto timing cover and secure with four screws (1). Tighten all screws
securely.
Figure 5-15. Cranking Cover and Gears Installation.
5-27
|