|
| |
TM 5-4320-308-13
5-3.
REPAIR/REPLACE CONNECTING ROD
This task covers:
a. Removal
c.
Repair
b.
Inspection
d. Installation
INITIAL SETUP
Tools
References
Shop set, automotive repair,
Para 4-18
Cylinder
field maintenance, basic
Para 5-7
Crankshaft Assembly
Allen socket, 6 mm
MIL-I-6868
Magnetic Particle Inspection
612 091 00
Equipment
Materials/Parts
Condition
Para
Condition Description
Diesel fuel oil (Item 2, Appendix E)
4-19
Piston removed from engine.
Dry cleaning solvent (Item 9, Appendix E)
General Safety Instructions
Lubricating oil (Item 6, Appendix E)
Well-ventilated area required.
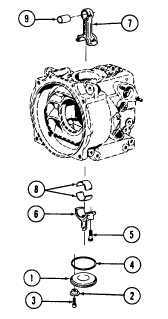
REMOVAL:
1 Using Allen wrench, remove cover (1) with four caps (2) and Allen screws (3).
2 Remove and discard preformed packing (4).
CAUTION
When removing connecting rod, make sure it does not knock against crankcase.
This could result in serious damage to connecting rod.
3
Using Allen socket 612 091 00, remove two Allen screws (5) and remove bottom half of connecting rod (6).
4 Remove top half of connecting rod (7) from top of crankcase.
5
Remove two bearing halves (8) from both halves of connecting rod (6 and 7).
5-6
|