|
| |
TM 5-4320-306-24
4-11.
REPLACE/REPAIR CONNECTING ROD ASSEMBLY (Continued)
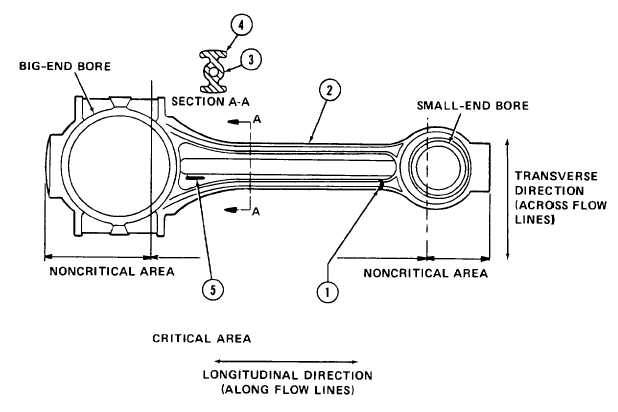
4
Repair minor cracking in the transverse direction (1) (across flow lines) of the connecting rod (2) as long as the
cracks are no longer than 0.50 inch (12.70 mm) and can be completely removed by grinding no deeper than
0.0156 inch (0.3962 mm). If the cracking extends over the edge of the H section (3) or on both sides of the
connecting rod flange (4), the crack must be completely removable, by grinding no deeper than 0.0050 inch
(0.1270 mm). Otherwise, replace connecting rod (2) in either case Minor cracking in the longitudinal direction (5)
(along flow lines) may be removed by grinding no deeper than 0.0313 inch (0.7950 mm). If crack is deeper,
replace connecting rod Remove rust Do not finish connecting rod.
NOTE
When grinding out minor nicks, abrasions, or cracks on connecting Pod, make sure ground areas
form smooth contours with adjacent unground areas.
5
Repair bearing shells.
a.
Replace bearing shells if they are excessively worn, out-of-tolerance, out-of-round, or show any scoring,
pitting, flaking, etching, or signs of overheating. Replace bearing shells if they show any bright spots on
the back or outside surfaces.
b
Install new bearing shells in connecting rod only if necessary. Follow procedure described in step 13.
Tighten and retighten big-end bolts in accordance with procedure described in step 9.
4-90
|