|
| |
TM 5-4320-306-24
4-9. REPLACE/REPAIR CYLINDER ASSEMBLY (Continued)
REPAIR:
1
Remove slight ridges, score marks, and glaze on cylinder bore with a hone equipped with 120-grit stones. Work
hone up and down rapidly the full length of the cylinder bore several times in a criss-cross pattern.
NOTE
Criss-cross pattern produces hone marks on a 45 degree axis, which aids piston movement and helps
prevent formation of ridges.
WARNING
Dry cleaning solvent P-D-680 (safety or Stoddard's Solvent) is potentially dangerous. Avoid repeated and
prolonged breathing of vapors and skin contact with the liquid. Do not use near open flame, arcing
equipment, or other ignition sources. Always wear eye protection and protective clothing. The flash point
of P-D-680 is 100° to 138°F (38° to 59°C).
Death or serious injury could occur if compressed air is directed against the skin. Do not use compressed
air for cleaning or drying unless the pressure is/has been reduced to 30 psi (2.11 kgcm2) or less. When
working with compressed air always use chip guards, eye protection, and other personal protective
equipment.
2
Reclean each repaired cylinder with dry cleaning solvent and dry with compressed air. Remove any burrs
ADJUSTMENT:
1
Recheck cylinder bore and out-of-round on repaired cylinder as described in CLEANING/INSPECTION step 4.
Replace if necessary.
CAUTION
Piston and cylinder damage may result if pistons are not returned to their original cylinders. Observe
matchmarks so that mixups do not occur.
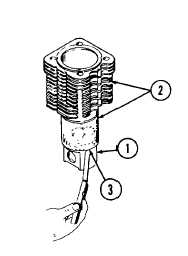
2
Insert each piston (1) in its respective cylinder (2) or replacement and measure the piston skirt-to-cylinder
clearance (3) with a feeler gage. If clearance is not within 0.0032 to 0.0166 inch (0.081 to 0.422 mm), replace
piston.
3
Install cylinder (new or replacement) in proper bore of crankcase and measure cylinder bore and out-of-round
with a bore gage at the locations described in CLEANING/INSPECTION step 5. Rehone or replace as needed.
4-68
|