|
| |
TM 5-4320-306-24
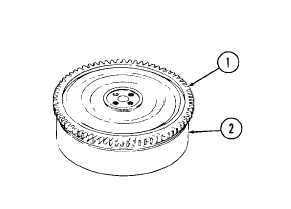
3-7. REPLACE/REPAIR FLYWHEEL (Continued)
WARNING
Operate acetylene torches properly and be alert for leaks on
any part of the equipment. Inhalation of acetylene produces
headache, dizziness, nausea, and possible loss of conscious-
ness. If acetylene is inhaled, seek fresh air immediately.
Ring gear damage may occur if gear is overheated. Do not
heat gear over 400°F (204°C). Use minimum amount of heat
required to fit ring gear on flywheel. Keep flame moving at
all times.
3 Install replacement ring gear (1) on flywheel (2) as follows
a. Support flywheel (2) (ring gear side up) on a solid flat surface.
b. Rest ring gear (1) on a flat metal surface
NOTE
Heat-indicating crayons, which are placed on the ring gear
and melt at a predetermined temperature, may be obtained
from most vendors. Use of crayons will guard against over-
heating the gear
c.
Heat ring gear (1) evenly with an acetylene torch to 400° F (204°C) Keep moving flame rapidly over surface of
gear.
d.
Use tongs to position replacement gear in identical position to old gear.
e.
Tap gear in place against shoulder If gear will not seat flatly on shoulder, remove it and carefully repeat the
heating operation
3-37
|