|
| |
TM 5-4320-305-24
4-13. REPLACE/REPAIR CRANKCASE ASSEMBLY (Continued)
CLEANING/INSPECTION:
WARNING
Death or serious injury could occur if diesel fuel oil is not handled carefully. Use
in a well-ventilated area away from open flame, arcing equipment, ignition
sources, heaters, or excessive heat. Always store fuel in proper, marked
containers. DO NOT SMOKE.
Death or serious injury could occur if compressed air is directed against the skin.
Do not use compressed air for cleaning or drying unless the pressure is/has been
reduced to 30 psi (2.11 kgcm2) or less. When working with compressed air always
use chip guards, eye protection, and other personal protective equipment.
Live steam used for cleaning shall not exceed 100 psi (690 kPa). Use goggles or
face shield for eye protection. Do not direct live steam against skin.
1
Clean crankcase thoroughly with live steam. Clean all exterior and interior openings and surfaces. Be especially
careful to clean all oil passages to make sure they are open. Use a small and/or large wire bristle brush where
necessary to remove carbon or other deposits from openings and surfaces. Use diesel fuel oil as necessary to
soften and remove carbon or hardened oil deposits. Dry with compressed air.
2
Thoroughly inspect crankcase for any cracks, discoloration, distortion, rust, corrosion, or other damage. Use
MIL-1-
6868 magnetic particle inspection to detect cracks. If crankcase is cracked, distorted, overheated, seriously rusted
or corroded on machined surfaces, or exhibits other serious damage, replace crankcase.
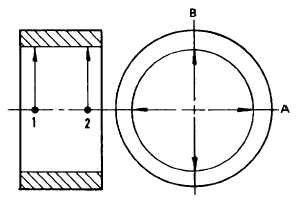
3
Make sure camshaft bushing (1) is seated properly in crankcase. Inspect for damage or excessive wear. Measure
bushing bore with micrometer at points 1 and 2 and along axes A and B. Bore measurement should be 1.889 to
1.8911 inches (47.98 to 48.034 mm). If measurement is outside these tolerance limits, replace bushing.
4-106
|