|
| |
TM 5-4320-305-24
3-21.
REPLACE/REPAIR IDLER PULLEY ASSEMBLY (Continued)
5
Using nut (11) and washer (12), secure assembled idler pulley cover to studs (26) in the engine front cover. Tighten
nuts.
6
Install bolt (6), bushing (18), spacing washers (9), and ring (10) on pulley (7), and using bolt (6), washer (5), and nut
(4), secure pulley (7) to pulley lever (8).
7
Check the adjustment of the pulley according to ADJUSTMENT below. Readjust pulley as required.
8
Once the pulley is adjusted, use bolts (1) to secure cover (2) and gasket (3) to V-belt pulley (7). Use a new gasket
only if the old gasket was damaged and discarded.
ADJUSTMENT:
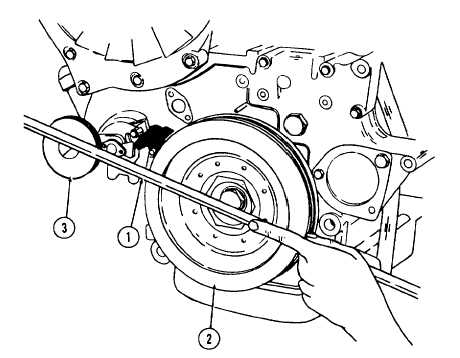
1
With a metal straightedge (1) held firmly across the face of crankshaft pulley (2), check the alinement of idler pulley
(3). The pulleys are alined if the straightedge continues across the face of the idler pulley without moving the edge
from the face of : he crankshaft pulley.
2
Idler pulley is out of fore-and-aft alinement if the pulley face is in front of or in back of the straightedge (1) held
across the face of crankshaft pulley.
3-117
|