|
| |
TM 5-4320-305-24
3-18. REPAIR ALTERNATOR, V-BELT PULLEY, AND FAN
This task covers:
a.
Disassembly
c. Test
e.
Operational Check
b.
Cleaning/inspection/Repair
d. Assembly
INITIAL SETUP
Test Equipment
Multimeter
Tools
Equipment
Shop set, automotive repair, field
Condition
maintenance, basic
Para
Condition Description
Arbor press
Bearing extractor
2-35
Alternator, V-belt pulley, and
Electronic soldering iron, 25-watt
fan removed from engine
.
Voltage regulator removed from
Materials/Parts
alternator.
Crocus abrasive cloth (Item 1, Appendix C)
Dry cleaning solvent (Item 17, Appendix C)
Rosin flux solder (Item 16, Appendix C)
Special Environmental Conditions
Well-ventilated area required for cleaning.
DISASSEMBLY:
CAUTION
Damage to the alternator could occur if the following precautions are not observed.
Do not reverse connection polarity when connecting electrical leads and cables to
the alternator.
Do not operate the alternator in an open circuit with the rotor winding energized.
Do not ground the alternator output circuit or field terminal.
Do not disconnect leads from alternator or other electrical components before
disconnecting the negative (-) terminal from the battery.
Do not disconnect the battery while the alternator is operating.
Do not reverse battery cable connections.
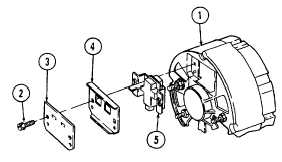
1
Place alternator (1) in a vise. Remove two
screws (2). Remove brush cover (3), dust shield
(4), and brush assembly (5) from alternator (1).
3-87
|