|
| |
TM 5-4320-304-14
TM 08922A-14/1
5-5. REPLACE ENGINE ASSEMBLY
This task covers:
a. Removal
b. Installation
INITIAL SETUP
Tools
General Safety Instructions
Shop equipment, automotive maintenance
and repair, common no. 1
Hoisting equipment shall be used only by
authorized personnel.
Equipment
Condition
Para
Condition Description
4-14
Pump case assembly removed.
4-15
Air filter assembly removed.
REMOVAL:
Death or serious injury could occur if unauthorized or unnec-
essary personnel are in the hoisting area. Permit only person-
nel actually engaged in the hoisting operation to be near the
unit and hoisting equipment. All instructions for the hoisting
operations must come from one authorized person.
Death or serious injury to personnel or damage to equipment
could occur from improper hoisting. Hoist the load slowly to
avoid tearing out lifting strap, slipping slings, or load shift. Do
not jerk the load or swing it from side-to-side when hoisting.
This places additional stress on hoisting components which
can cause failure and loss of load. Be sure hoisting equipment
is on solid footing and is suitable for the size of the load.
Watch boom angle and overhead clearance when hoisting.
1
2
3
4
5-6
Engine will be damaged if set on
cover at bottom of engine. Pro-
vide adequate blocking to support
engine after removal.
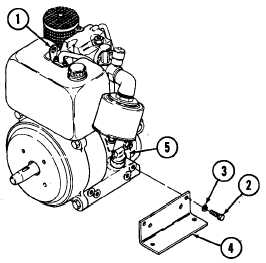
Position a suitable lifting device over engine assembly.
Attach to lifting strap (1).
Put tension on slings. Make sure engine is properly
supported.
Remove four hex screws (2) and four spring washers
(3) from each engine bracket (4). Remove engine
assembly (5).
Lift engine assembly (5) and lower onto blocks on
a stable, level work platform.
|