 |
|||
|
|
|||
|
|
|||
| ||||||||||
|
|
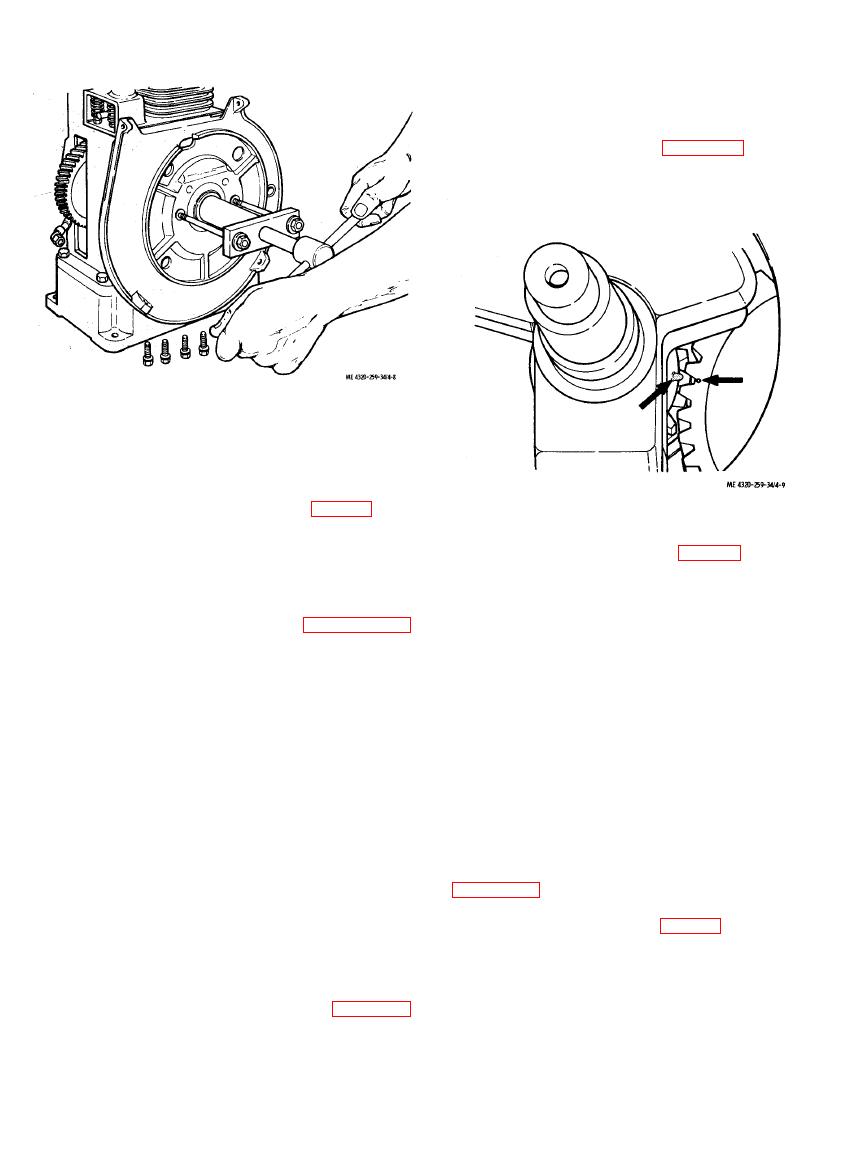 b. Place
the cylinder block on an arbor press and
insert the untapered end of the crankshaft into the
bore of the bearing in the cylinder block. Aline the
timing mark on the tooth of the gear section of the
crankshaft with the timing mark (dot) on the
cam shaft gear as shown in figure 4-9. With the
marks alined, press in the crankshaft until it is fully
seated on the ball bearing. Recheck timing marks
to assure that they are alined.
f. Remove the cylinder block. It may be
necessary to use a press to dislodge the crankshaft.
Take care to prevent damage to the threaded
crankshaft ends.
remain with the shaft or may remain in the bearing
seats of the cylinder block or bearing plate. Press
out the seals (8 and 11) and bearings (9 and 12).
bearing plate (5) so that the shielded side will face
out when the bearing plate is installed on the
engine. Make sure the bearing is pressed squarely
a. Discard the seals and gaskets.
into the bearing plate or correct crankshaft end
b. Clean bearings as directed in paragraph 2-7.
play will not be registered.
c. Clean all other parts with an approved
d. Position the bearing plate (5) on the cylinder
cleaning solvent; dry thoroughly.
block, using one 0.020-inch and one 0.010-inch
gasket. Install the thicker gasket next to the
balls, excessive looseness between races and balls,
cylinder block. Carefully press the bearing plate
rough, binding, or catching operation, and other
into position on the cylinder block. Secure the
damage; replace damaged ball bearings.
bearing plate with four cap screws (2), lock washers
e. Inspect the crankshaft for damaged threads,
(3), and flat washers (4). Tighten the cap screws
worn or broken gear teeth, scored or worn crank-
pin, misalinement, a n d other damage. The
evenly and alternately to prevent distorting the
bearing plate.
minimum allowable diameter of the crankpin
e. Check the crankshaft end play by measuring
journal is 0.9355 inch. The journal width shall be
with a feeler gage. Measure between the inner race
at least 0.875 so that connecting rod side play does
of the ball bearing pressed into the cylinder block
not exceed 0.016 inch. Check the bearing seat
and the shoulder on the crankshaft as shown in
surface for scoring or damage. Remove any burrs
figure 4-10. End play shall be 0.0038 to 0.0228
from the crankshaft with a fine stone. Replace the
inch. If end play is not within the required limits,
crankshaft if damaged.
remove the bearing plate (5, fig. 4-7) and add or
f. Inspect the bearing plate for cracks, distor-
remove gaskets ( 6 ) . The addition of gasket
tion, damaged bearing bore, and damaged threads;
thickness will increase end play. Subtraction of
replace a damaged bearing plate.
gaskets will decrease end play.
Reassemble the crankshaft as shown in figure 4-7,
items 2 through 11. Note the following:
a. Press the rear main bearing (12) into the
bearing seat of the cylinder block so that the
bearing shield faces out of the block.
|
|
Privacy Statement - Press Release - Copyright Information. - Contact Us |
