 |
|||
|
|
|||
|
Page Title:
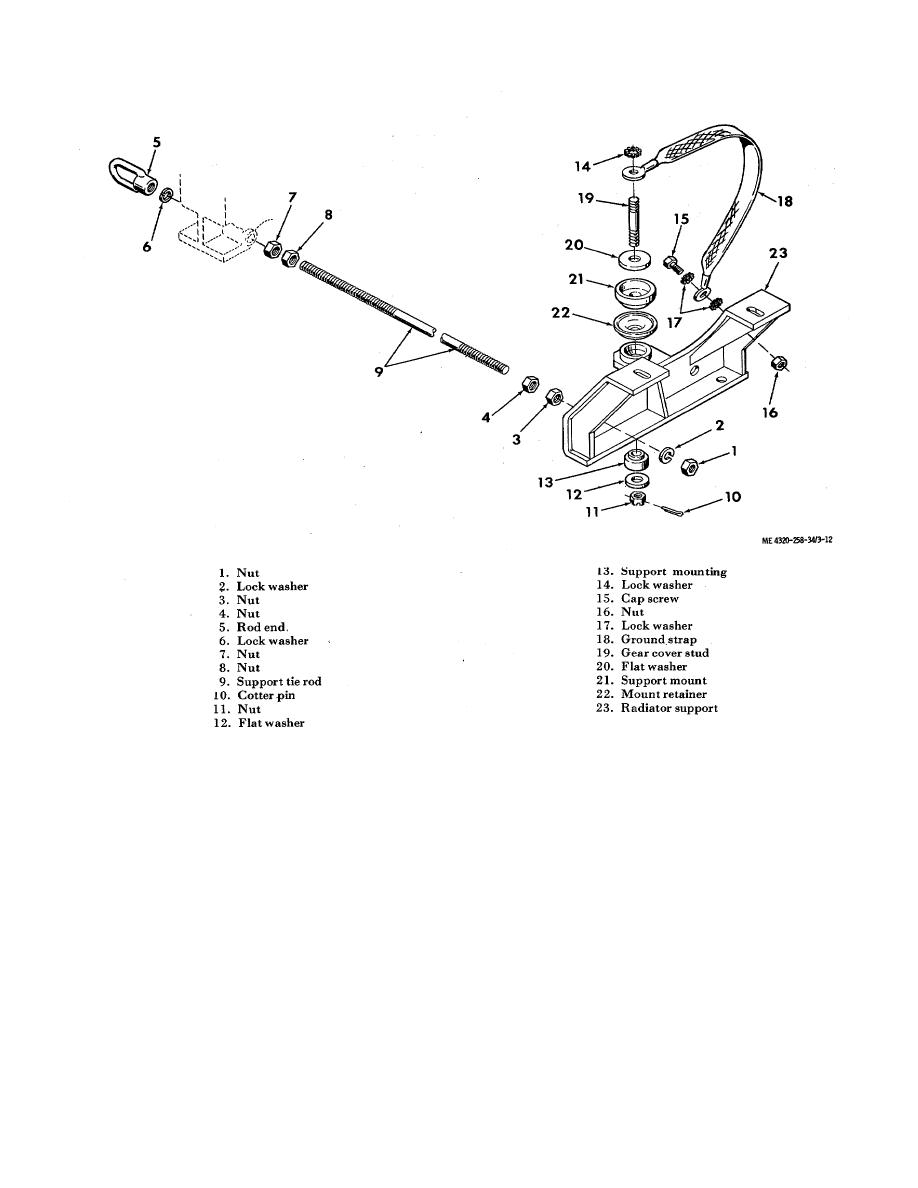
Figure 3-12. Engine mounting parts, exploded view |
|
||
| ||||||||||
|
|
 TM 5-4320-258-34
Figure 3-12. Engine mounting parts, exploded view
Caution: Do not rest the engine on its oil
3-18 cracks, deterioration, loss of resiliency, cuts, and
pan. This may damage the oil pan.
other damage; replace the mounting parts if damaged.
(3) Inspect the support tie rod and the stud
(6) Remove the cotter pin (10), nut (11),
for damaged threads and distortion; replace damaged
flat washer (12), and support mounting (13) from the
parts.
end of the gear cover stud (19). Raise the engine out of
(4) Inspect the radiator support for cracks,
engagement with the radiator support. Mount the
broken weldments, distortion, and other damage;
engine on an overhaul stand or provide proper blocking
reweld, straighten, or replace a damaged support.
to rest it on the floor.
(5) Inspect the ground strap for rust,
(7) Remove the flat washer (20), support
corrosion, and other damage. If necessary, sand- paper
mount (21), and mount retainer (22) from the radiator
the end terminals to assure a good electrical contact
support.
b. Cleaning and Inspection.
between the radiator support and engine at installation.
c. Installation.
(1) Clean the rubber mounting parts with a
(1) Install the engine on the radiator
cloth dampened with cleaning solvent (FED. Spec. P-
support
D-680). Wash all remaining parts in solvent.
(2) Inspect the rubber mounting parts for
3-18
|
|
Privacy Statement - Press Release - Copyright Information. - Contact Us |
