 |
|||
|
|
|||
|
Page Title:
Thermostat, Outlet Elbow, Lines, and Fittings |
|
||
| ||||||||||
|
|
 (b) Heat the water slowly while
watching the thermometer and thermostat.
The
thermostat must start to open before the thermometer
indicates 180 F. Replace the thermostat if it fails to
open at 180F or if it opens at too low a temperature.
(4) Inspect the water outlet elbow for cracks,
damaged threads, and distortion; replace a damaged
elbow.
(5) Inspect the hoses for cracks, cuts,
deterioration, brittleness, and other damage; replace
damaged hoses.
(6) Inspect all other parts for cracks,
distortion, and other damage; replace damaged parts.
c. Installation. Installation of the thermostat, outlet
elbow, hoses, and fittings is the reverse of removal.
Refer to figure 4-14. Service the coolant and engine
lubrication systems. After installation, run the engine
until it reaches operating temperature, and check for
leaks. Correct any leaks noted.
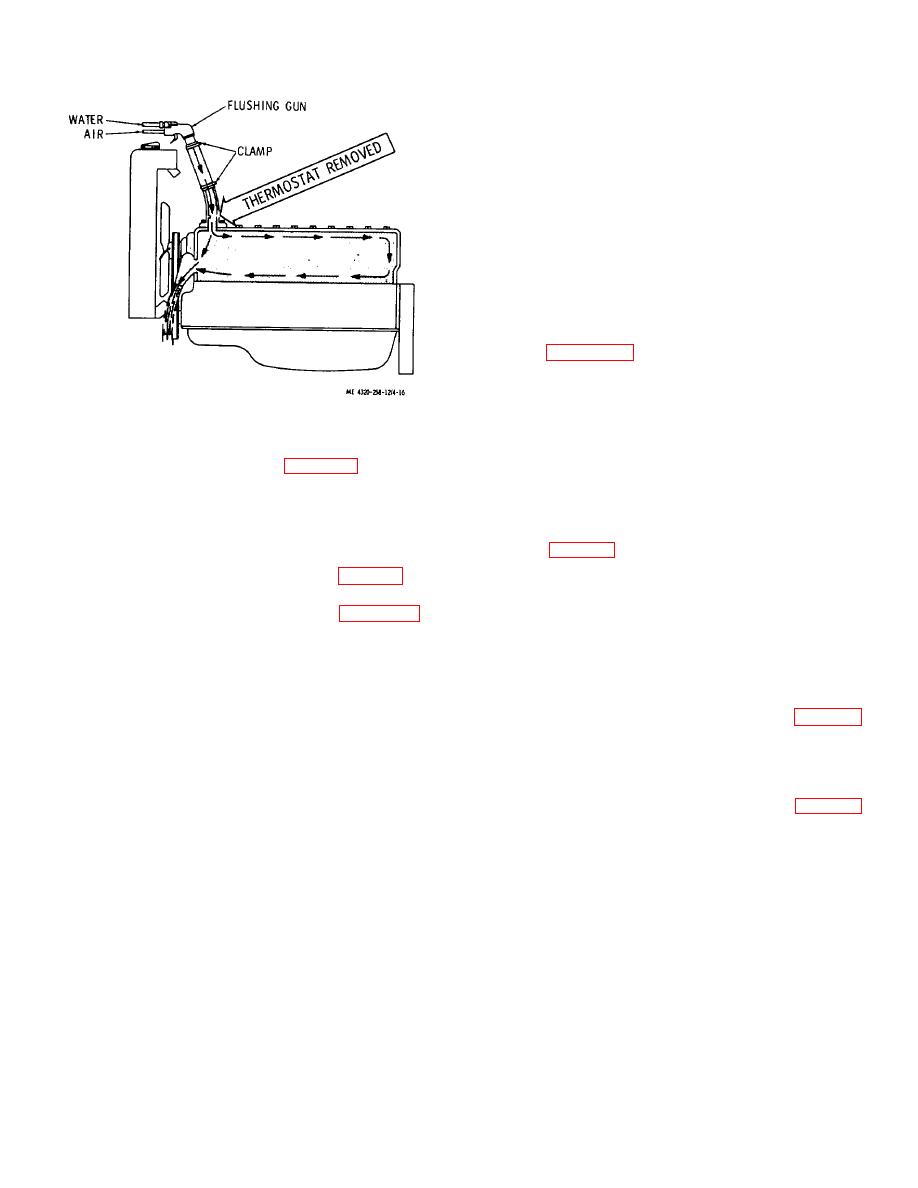
Figure 4-16. Reverse-flushing tee engine block.
4-30. Water Pump, Cooling Fan and Fan Belt
a. Fan Belt Adjustment. The fan belt should be
d. Install the thermostat and connect the hoses
tensioned so that it can be deflected approximately 3/4
between the engine and radiator (para 4-29). Start the
inch with thumb pressure at a point midway between
engine and allow to run until the coolant reaches
pulleys at the longest belt span. Adjust belt tension as
operating temperature. Check for coolant leaks and
follows:
correct if any are noted.
(1) Loosen the alternator strap mounting
4-29. Thermostat, Outlet Elbow, Lines, and Fittings
screw (5, fig. 4-18).
a. Removal.
(2) Loosen the adjusting screw (3) on the
(1) Drain the radiator and block (para 2-3f).
adjusting strap (2) and pull the alternator (1) away from
(2) Remove and disassemble the thermostat,
the engine with hand pressure to tighten the fan belt (4).
outlet elbow, lines, and fittings as shown in figure 4-17.
(3) Hold the alternator away from the engine
b. Cleaning, Inspection, and Thermostat Testing.
and tighten the adjusting screw (3). Recheck fan belt
(1) Clean all parts by washing in warm, soapy
tension and readjust if necessary. Tighten the strap
water. Remove any greasy or gummy deposits with a
mounting screw (5) after proper adjustment is made.
cloth dampened with cleaning solvent (fed. spec. P-D-
b. Removal.
680) ; dry thoroughly.
(1) Loosen the adjusting screw (3, fig. 4-18)
(2) Inspect the thermostat for obvious
on the alternator adjusting strap and push the alternator
defects, including ruptured bellows and distortion. If the
toward the engine to loosen fan belt tension. Slip the
valve, when cold, can be pushed off its seat with only
fan belt (4) off the alternator drive pulley and disengage
slight effort, the thermostat is defective and must be
it from the fan and pulley.
replaced.
(2) Remove the four cap screws (1, fig. 4-19)
(3) Check the thermostat operation as
and lock washers (2) that secure the cooling fan (3) to
follows:
the pulley on the water pump; remove the cooling fan.
(a) Hang the thermostat by its frame in
a container of water so that it does not touch the
container. Hang a thermometer in the container to
maintain a check of water temperature.
4-20
|
|
Privacy Statement - Press Release - Copyright Information. - Contact Us |
