 |
|||
|
|
|||
|
Page Title:
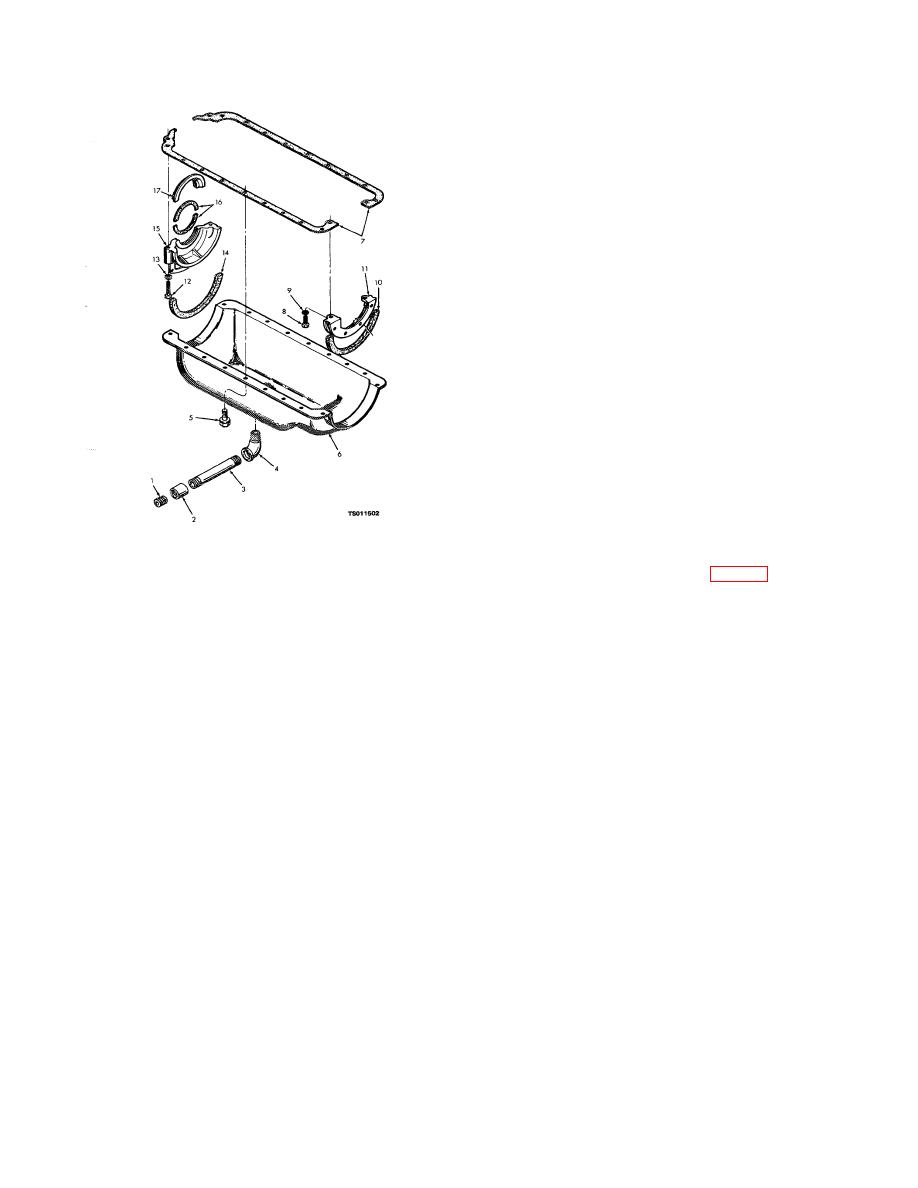
Figure 4-6. Oil pan and filler blocks, exploded view. |
|
||
| ||||||||||
|
|
 TM 5-4320-234-34
WARNING
Clean all parts in a well-ventilated
area. Avoid inhalation of solvent
fumes and prolonged exposure of
skin to cleaning solvent. Wash
exposed skin thoroughly.
Dry
cleaning solvent (Fed. Spec. P-D-
680) used to clean parts is
potentially
dangerous
to
personnel and property. Do not
use near open flame or excessive
heat. Flash point of solvent is 100
F. to 138 F. (38 C. to 59 C.).
(2) Clean all remaining parts with cleaning
solvent (Fed. Spec. P-D-680); dry thoroughly.
(3) Inspect the oil pan for cracks, severe
dents, holes, damaged threads, and other damage;
replace a defective oil pan.
(4) Inspect the filler blocks for cracks,
distortion, and other damage; replace damaged filler
blocks.
1.
Oil drain plug
c. Installation.
2.
coupling
3.
Nipple
(1) Install the seal (16, fig. 4-6) into the rear
4.
Elbow
filler block (15) and oil guard (17) as follows:
5.
Assembled washer screw
(a) Flatten the jute seal in a vise or with a
6.
Oil pan
7.
Oil pan gasket
hammer until the seal fits into the groove in the filler
8.
Capscrew
block or oil guard.
9.
Lockwasher
(b) Roll the seal into the oil guard or filler
10.
Front filler block seal
block groove with a round object.
11.
Front filler block
12.
Capscrew
(c) Trim the seal 0. 020 to 0. 030 inch (0.
13.
Lockwasher
0500 to 0. 0750 cm) above the flat surface of the oil
14.
Rear filler block seal
guard or filler block, using a sharp knife or razor blade.
15.
Rear filler block
Make sure the cut is parallel to the flat surface of the
16.
Oil guard seal
17.
Rear oil guard
casting.
Figure 4-6. Oil pan and filler blocks, exploded view.
(2) To replace the neoprene seals (10 and
14) on the filler blocks (11 and 15), make sure the
(2) Remove the 18 assembled washer screws
contact surface is free of cement, dirt, and oil. To hold
(5) that secure the oil pan (6) to the block; remove the
the seal in place for assembly, use a small spot of
oil pan and gaskets (7).
nonhardening cement in the center of the contacting
(3) Remove the two capscrews (8) and
surface before you insert the seal into the groove. No
lockwashers (9) that secure the front filler block (11) to
other cement is required.
the block; remove the filler block and seal (10).
(3) Lubricate all seals with engine oil. With
(4) Remove the two capscrews (12) and
the crankshaft in place, the assembled rear oil guard
lockwashers (13) that secure the rear filler block (15) to
(17) and jute seal (16) can be rolled into place around
the block; remove the filler block and seal (14), oil guard
the crankshaft. Position the assembled rear filler block
seal (16) and oil guard (17).
(15) and seal (14) on the engine block; secure with the
two capscrews (12) and lockwashers (13). Tighten the
b. Cleaning and Inspection.
capscrews to 15 to 20 foot-pound torque.
(1) Discard and replace gaskets and seals.
(4) Position the front filler block (11) and seal
(10) on the engine block; secure with the two capscrews
(8) and lockwashers (9). Tighten the capscrews
4-9
|
|
Privacy Statement - Press Release - Copyright Information. - Contact Us |