 |
|||
|
|
|||
|
Page Title:
Section III. ORGANIZATIONAL MAINTENANCE |
|
||
| ||||||||||
|
|
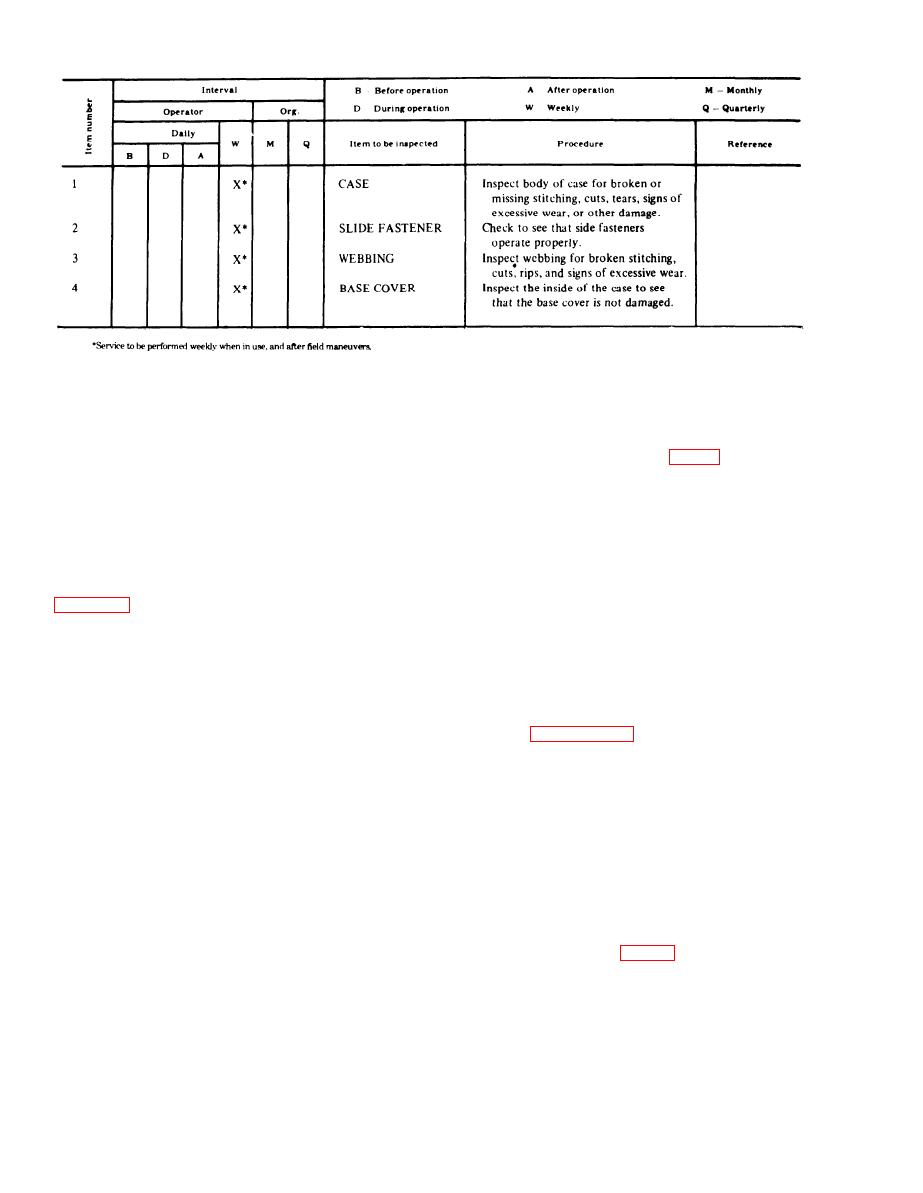 Table 6-1. PREVENTIVE MAINTENANCE CHECKS AND SERVICES
Section Ill. ORGANIZATIONAL MAINTENANCE
6-6. Special Tools and Equipment
b. Slide Fasteners. Replace slide fasteners as
follows:
The case does not require special tools, parts, or
(1) Remove the six rivets (1, fig. 6-3) holding the
equipment.
outside hinge (2) which secures the cover to the body
of the bag.
(2) Open the outer seams (3) holding the fastener
6-7. Replace
tape to the cover and the body and remove the
defective slide fastener (4).
a. Base Building Board.
(3) Place the new slide fastener in position. Sew
(1) Remove the ten screws that secure the
building board cover to the, base assembly, see step 1,
on duplicating the original stitching with type 301
stitch, six-or seven-stitches per inch.
(4) Replace the outside hinge in the original
the exterior screws that secure the frame to the bag.
(2) Fabricate a new base cover identical to the
position on the cover flap (5) and body. Secure the
hinge with new caps and rivets peened into place.
original cover. This can be requested from higher
c. Buckle. If the buckle on the carrying strap (6) is
echelon. The new cover will be the same size as the
missing or damaged, replace it with a new buckle.
original cover and the screw holes will be drilled to
The method for replacing the buckle loop chape is
duplicate those in the original. Also fabricate two
described in paragraph 6-9c.
blocks 13 inches by 1% inches by 1 inch for
d. End Clip. Replace a missing or damaged end clip
reinforcement.
on the carrying strap. Cut off a small portion of old
(3) Move the insulation to the center of the base
webbing so it will be straight and flat at the point of
and install the two wood blocks as shown in step 3.
entrance into the end clip. Insert the webbing into
(4) Install the new cover and secure with the ten
the end clip and flatten.
screws.
Section IV. DIRECT SUPPORT MAINTENANCE
6-8. Repair Parts, Special Tools
6-9. Repair
and Equipment
a. Side Reinforcement Webbing. To replace the
a. Special Tools and Equipment. The military
webbing around the base of the case, remove the 18
water can case does not require special tools and
screws and washers (1, fig. 6-4) securing the side
reinforcement webbing (2) to the base. Cut a new
equipment.
piece of 1 inch wide webbing using the old webbing
b. Repair Parts. Repair parts issued with or
authorized for the water can case are listed in the
as a pattern. Put the new webbing into position and
replace the screws and washers.
Repair Parts List, Section VI.
6-2
|
|
Privacy Statement - Press Release - Copyright Information. - Contact Us |
