|
| |
TM 10-4320-351-14
4.13.2 Replace Pulley Guard. (Refer to figure 4-13.)
This task consists of:
a. Removal
b. Installation
INITIAL SET-UP:
Tools:
Materials/Parts Required:
Tool Kit, General Mechanics
Nut, Self-Locking (Appendix I, Item 42)
(Appendix B, Section III, Item 1)
Equipment Condition:
Pumping assembly shut down (See para. 2.6)
a.
Removal.
(1)
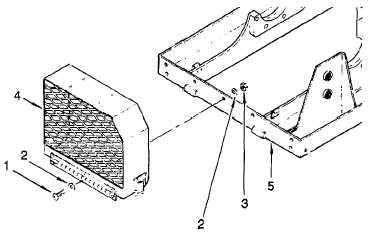
Remove the three cross-tip screws (1), flat washers (2) and self-locking nuts (3) that secure the pulley
guard (4) to the engine module frame (5). Discard the self-locking nuts (3).
b.
Installation.
(1)
Install the three cross-tip screws (1), flat washers (2) and self-locking nuts (3) to secure the pulley guard (4)
to the engine module frame (5). Raise and latch the pulley guard.
Figure 4-13. Pulley Guard Replacement
4-28
|