|
| |
TM 10-4320-343-14
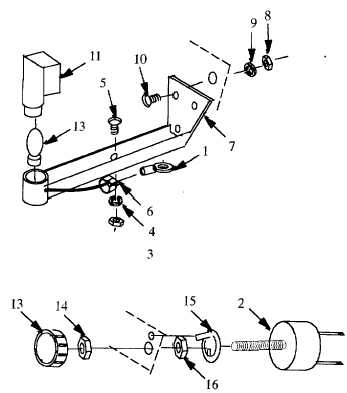
4.13.10.7 Installation. (Refer to figure 4-50.1)
a.
Install locating washer (15) and nut (16) on rheostat. Tab on locating washer must point away from rheostat.
b.
Align tap on locating washer (15) with hole on control panel and push rheostat (2) through control panel.
c.
Install nut (14) on shaft of rheostat (2) and secure rheostat to control panel.
d.
Position knob (13) on shaft of rheostat (2) and tighten setscrew in knob.
e.
Position and secure bracket support (7) onto control panel with nuts (8), lockwashers (9) and screws (10.)
f.
Place wire through clamp (6) and secure clamp on bracket support (7) with nut (3), lockwasher (4), and screw (5).
g.
Install incandescent light (12) and hood (11) on bracket support (7).
h.
Connect wires to rheostat (2).
Figure 4-50.1. Panel Light/Rheostat Replacement (Model 350 PAFN).
4-94.2 Change 1
|