|
| |
TM 10-4320-324-14
(4)
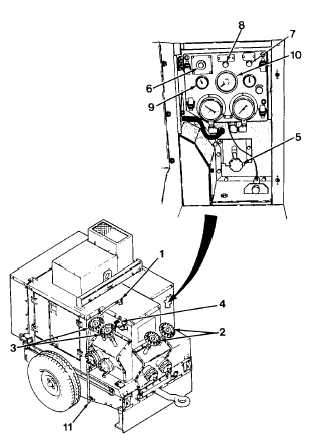
Push and raise throttle control (5) from detent
latch, releasing it to the idle position.
NOTE
If outside temperature is below + 10° F (-12° C)
refer to paragraph 2-9a for operation of cold
start system. Refer to Table 2-2 for perfor-
mance data.
(5)
Pull out EMERGENCY STOP switch (6).
CAUTION
Do not operate starter motor for more than 10
seconds; damage to starter can result.
(6)
Push in start switch (7) and oil pressure bypass
switch (8) simultaneously.
(7)
Upon engine start, release start switch (7).
NOTE
The engine will shut down when oil pressure
bypass switch is released if oil pressure is not 8
PSI or above.
(8)
Release oil pressure bypass switch (8) when 10
PSI is exceeded on gauge (9).
(9)
Allow engine to idle approximately two minutes, then smoothly push throttle control (5) into detent.
(10) Turn throttle control counterclockwise to increase or clockwise to decrease engine speed to approximately 2400
RPM as indicated on gauge (10).
(11) Open suction valve (2) that is connected to suction line.
CAUTION
Ensure discharge valve is open. Pump can overheat if discharge valve is closed for long periods of time.
A vapor-locked condition may result. If this occurs, shut down engine and allow pump to cool before filling
housing with liquid.
(12) Slowly open discharge valve (3) that is connected to discharge line.
(13) Observe the end of vent line (11) for liquid flowing from it. Once liquid begins to flow from line, close vent valve
(1).
2-13
|